Importing OpenWSN to Eclipse
- Xavier Vilajosana
Setup Project Structure
The first thing we need to do is create and import the code from OpenWSN source tree into our Eclipse project.
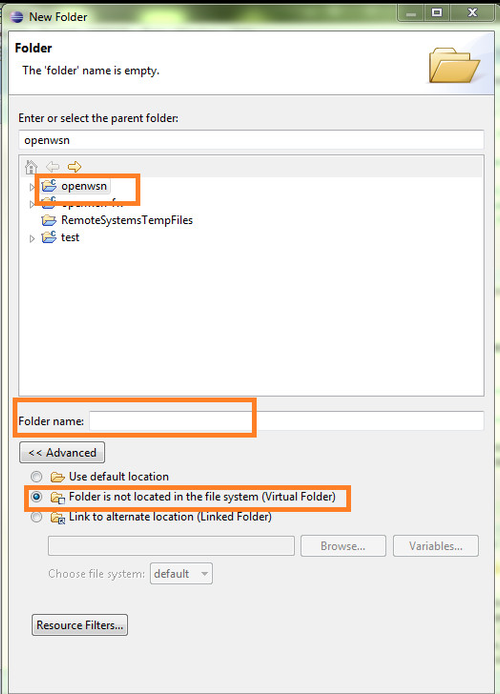
The Code structure should be organized in Eclipse Virtual Folders. To Create a Virtual Folder Right click on the OpenWSN project and click New -> Folder -> Advanced
Once all virtual folders have been created you need to add the OpenWSN source files at each folder. Usually files in that virtual folders will correspond to the files in the source code folders from OpenWSN. In the case of the BSP folder you might want to choose only the files that correspond to your platform. To add a file to a virtual folder the procedure is very similar to that off creating a virtual folder. Right click on the folder that the file has to be added and select New -> File -> Advanced. Check the Link to file in the file system option and browse to the file in the OpenWSN source folder.
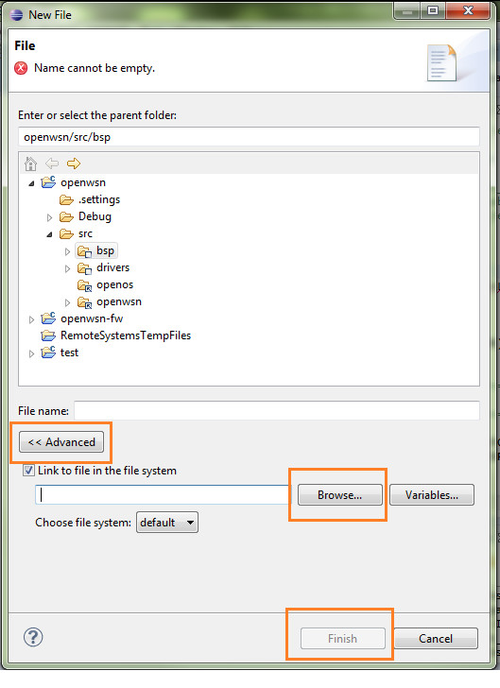
In that case however, a name for the file does not need to be provided as the file from the source tree will be linked. Repeat that procedure for all the files in the OpenWSN project.
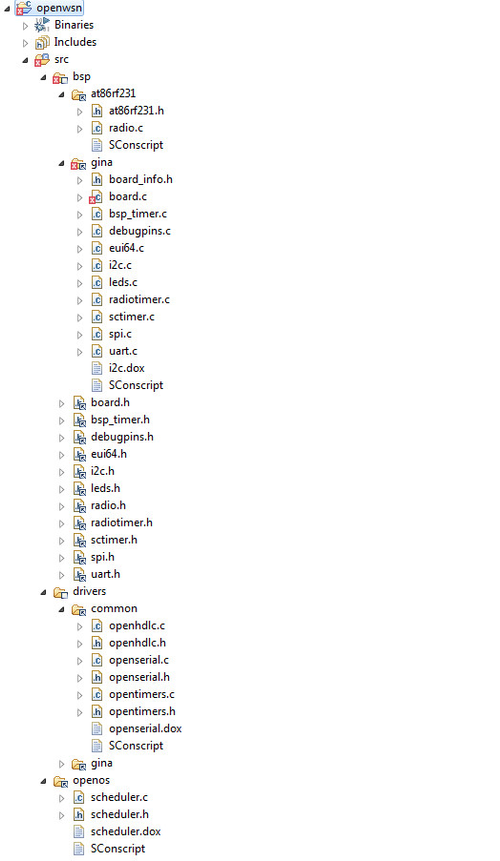
What files should be used?
Although this might depend on the platform and the applications that you want to run with OpenWSN a list is provided.

Configuring path in Eclipse
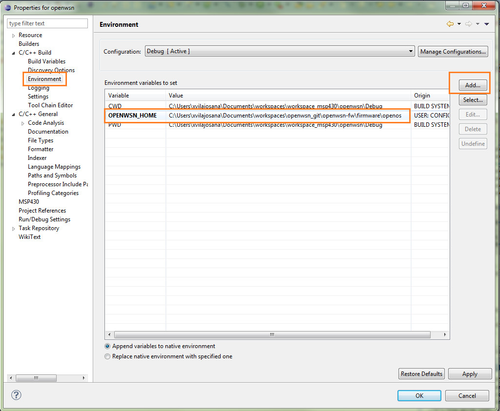
After the code structure has been setup the right path configuration needs to be set in eclipse project properties.
go to project properties and set a global variable that points to openwsn source folder: i.e openwsn-fw\firmware\openos
After that we need to tell the compiler to include the source folders. In the same properties but selecting the Settings option and selecting from that the Includes option.
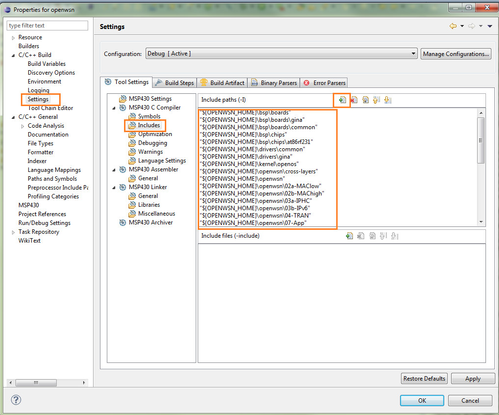
Included folders need to be added one by one. Here is a list of folders that I included for my Gina project.
"${OPENWSN_HOME}\bsp\boards"
"${OPENWSN_HOME}\bsp\boards\gina"
"${OPENWSN_HOME}\bsp\boards\common"
"${OPENWSN_HOME}\bsp\chips"
"${OPENWSN_HOME}\bsp\chips\at86rf231"
"${OPENWSN_HOME}\drivers\common"
"${OPENWSN_HOME}\drivers\gina"
"${OPENWSN_HOME}\kernel\openos"
"${OPENWSN_HOME}\openwsn\cross-layers"
"${OPENWSN_HOME}\openwsn"
"${OPENWSN_HOME}\openwsn\02a-MAClow"
"${OPENWSN_HOME}\openwsn\02b-MAChigh"
"${OPENWSN_HOME}\openwsn\03a-IPHC"
"${OPENWSN_HOME}\openwsn\03b-IPv6"
"${OPENWSN_HOME}\openwsn\04-TRAN"
"${OPENWSN_HOME}\openwsn\07-App"
"${OPENWSN_HOME}\openwsn\07-App\r6tus"
"${OPENWSN_HOME}\openwsn\07-App\layerdebug"
"${OPENWSN_HOME}\openwsn\07-App\udpecho"
"${OPENWSN_HOME}\openwsn\07-App\udprand"
"${OPENWSN_HOME}\openwsn\07-App\udplatency"
"${OPENWSN_HOME}\openwsn\07-App\rreg"
"${OPENWSN_HOME}\openwsn\07-App\rinfo"
"${OPENWSN_HOME}\openwsn\07-App\tcpinject"
"${OPENWSN_HOME}\openwsn\07-App\udpinject"
"${OPENWSN_HOME}\openwsn\07-App\udpprint"
"${OPENWSN_HOME}\openwsn\07-App\ohlone"
"${OPENWSN_HOME}\openwsn\07-App\tcpprint"
"${OPENWSN_HOME}\openwsn\07-App\tcpecho"
"${OPENWSN_HOME}\openwsn\07-App\udpstorm"
"${OPENWSN_HOME}\openwsn\07-App\rleds"
"${OPENWSN_HOME}\openwsn\07-App\rwellknown"
And click OK to save all changes. With that we are done!
Make sure that you can compile OpenWSN project and produces openwsn.elf file.
