msp430gcc on Eclipse with mspdebug (Preferred)
- Xavier Vilajosana
Owned by Xavier Vilajosana
Introduction
This tutorial describes how to install and configure mspgcc, mspDebug and Eclipse to program and debug MSP430 microcontrollers on Windows.
The method should work with slight differences on Linux and Mac.
What is needed?
- Windows XP, Vista, 7 or later. (The described procedure might work on Linux and Mac)
- MSP430 USB FET Programmer
Step 1: Download
- download Eclipse CDT for C/C++ developers from here
- download the msp430 toolchain from Windows, Linux 32b, Linux 64b,Mac
Step 2: Install
- Unzip eclipse file into some folder you like eclipse to be.e.g C:\eclipse (/opt/eclipse or /home/username/eclipse in Linux , Mac)
- Open the zip file of msp430-toolchain and unzip the contents to C:\msp430-toolchain (/opt/msp430-toolchain or /usr/local/msp430-toolchain in Linux , Mac)
- Open eclipse and go to Help->Install New Software
- add the following repository to eclipse: http://eclipse.xpg.dk
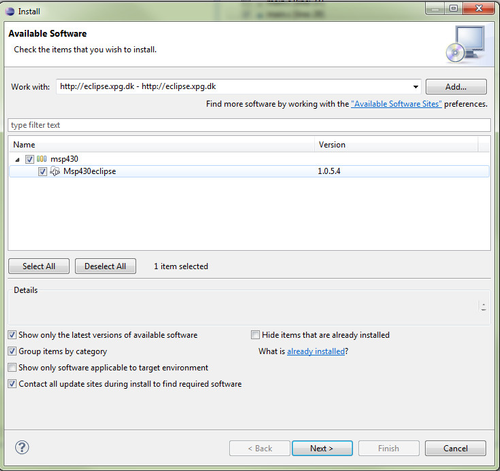
- Install the MSP430 plugin and restart eclipse
- add the following repository to eclipse: http://eclipse.xpg.dk
Step 3: Configure Eclipse
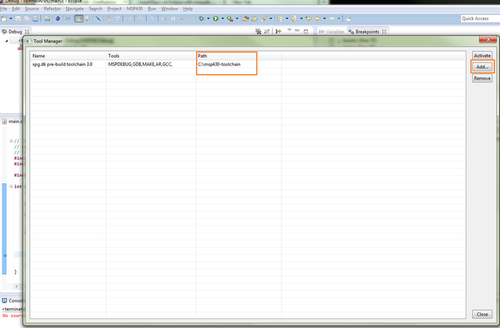
- Configure the toolchain in eclipse. Click the menu MSP430->Tool Manager
- Add the toolchain which is installed in c:\msp430-toolchain or the folder you decided to use. (/opt/msp430-toolchain or /usr/local/msp430-toolchain in Linux , Mac)
- Click add and browse to the desired folder. After click Activate
Step 4: Compiling some code
- In order to use the MSP430 features, you have to create a new C or C/C++ project and choose "Empty Project" from the "MSP430 Cross Target Application" group.
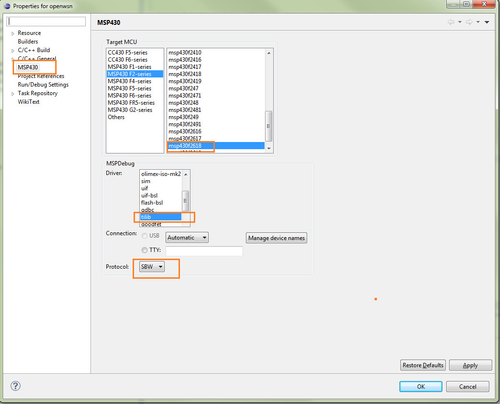
- Right click on the project and go to Properties
- Select the MSP430 tab. Configure your msp430 platform (in my case msp430f2618 as Gina mote uses that uC)
- Select tilib driver. In case that you are using Linux test with tilib and uif.
- For Linux users facing problems to configure MSP430FET UIF follow this instructions to setup the FET driver.
- To create a new source file click on the project folder and select new -> Source file. Name the file e.g main.c
Copy some testing code on it:
sample code#include <io.h> #include <stdint.h> #include "msp430x26x.h" //use your msp430 configuration! int main() { // The main function volatile uint8_t i = 0; WDTCTL = WDTPW + WDTHOLD; P2DIR |= 0x0F; // do forever: while (1) { i++; if (i == 0) { //toggle red led in gina P2OUT ^= 0x08; } } }- In order to compile go to Project -> Build All or press Ctrl+B
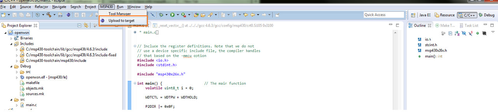
- To program the device go to MSP430 tab and select Upload to Target
Step 5: Debugging
- To Debug with Eclipse click the Debug arrow near the Debug "bug – symbol" on the toolbar
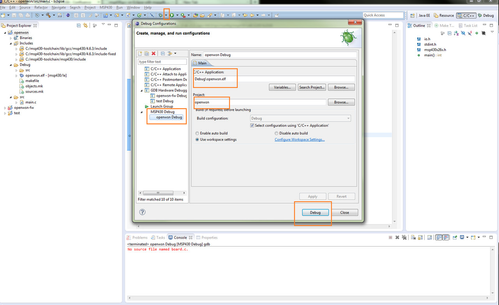
Click Debug button and wait the debugger to start. The code will stop at your main.
NOTE: Make sure to Program the device before debugging using the MSP430 tab and Upload to Target option
Known Issues
- If linker complains about the size of the code that is larger than the available ROM, use -Os compiler optimization flag.
- In case the tilib option does not work you might want to test uif option.
- It seems that the tilib option depends on the tilib drivers for MSP430FET UIF, one possible way to get that drivers is to install the evaluation version of IAR workbench provided by TI for free
- To do so, download the IAR KickStart from the Texas Instruments website from here and install it with the evaluation key that limits the amount of code you can compile.
- It seems that the tilib option depends on the tilib drivers for MSP430FET UIF, one possible way to get that drivers is to install the evaluation version of IAR workbench provided by TI for free
References
TI LaunchPad on Windows link
- Hack a day link
- StackOverflow thread on msp430 on eclipse link
- XPG Eclipse link
- MSPDebug link
