Motivation

IoT-LAB is a sensor network platform distributed in six sites of France. Its goal is to serve as a testbed for experiments and applications related to the future Internet of Things. There are three types of boards in IoT-LAB. One of them is the WSN430, with two versions: WSN430-v13b and WSN430-v14, differing the radio chip.
In order to make OpenWSN run on IoT-LAB (WSN430 nodes), the WSN430 Board Support Packages (BSPs) - hardware-dependent source code that controls the board components (e.g. UART, radio chip) - must work perfectly. Once they are working, the Protocol Stack (which is hardware-independent) runs above it.
This demo assumes the OpenWSN repositories are cloned and updated in your environment, and that the softwares required by OpenWSN are already installed. If this is not the case, follow the instructions in Download OpenWSN
Info
This guide was prepared using
- Ubuntu 13.10, 64-bit
- MSPGCC
- Part of this demo runs on IoT-LAB web interface, so it's supported by other operating systems.
- If you don't like MSPGCC, you can use IAR Embedded Workbench
- In the following lines, a demo will be presented in order to test the WSN430-v14 UART and radio drivers, for the implementation of OpenWSN on IoT-LAB.
Testing UART interface
In this demo, you will:
Build firmware
Generate an SSH key
Login in IoT-LAB Web Interface
Append your SSH key into your profile
Create a new experiment
Access the site server and the node
6.1 Receive data from the node
1) Build Firmware
user@pc:~/Desktop/openwsn/openwsn-fw$ sudo scons board=wsn430v14 toolchain=mspgcc bsp_uart
[sudo] password:
scons: Reading SConscript files ...
 ___                 _ _ _  ___  _ _
| . | ___  ___ ._ _ | | | |/ __>| \ |
| | || . \/ ._>| ' || | | |\__ \|   |
`___'|  _/\___.|_|_||__/_/ <___/|_\_|
     |_|                  openwsn.org
scons: done reading SConscript files.
scons: Building targets ...
Compiling firmware/openos/projects/common/01bsp_uart/01bsp_uart.o
Linking   firmware/openos/projects/common/01bsp_uart_prog
msp430-size firmware/openos/projects/common/01bsp_uart_prog
   text	   data	    bss	    dec	    hex	filename
   3026	     16	     42	   3084	    c0c	firmware/openos/projects/common/01bsp_uart_prog
msp430-objcopy --output-target=ihex firmware/openos/projects/common/01bsp_uart_prog firmware/openos/projects/common/01bsp_uart_prog.ihex
msp430-objcopy --output-target=binary firmware/openos/projects/common/01bsp_uart_prog firmware/openos/projects/common/01bsp_uart_prog.bin
scons: done building targets.
- For debugging: 01bsp_uart_prog.ihex
2) Generate a SSH key
user@pc~$ ssh-keygen -t rsa
Generating public/private rsa key pair.
Enter file in which to save the key (/home/you/.ssh/id_rsa):
Created directory '/home/you/.ssh'.
Enter passphrase (empty for no passphrase):
Enter same passphrase again:
Your identification has been saved in /home/user/.ssh/id_rsa.
Your public key has been saved in /home/user/.ssh/id_rsa.pub.
The key fingerprint is:
14:13:be:59:3c:ab:fa:df:78:8e:39:fc:72:9c:9e:7d user@pc
The key's randomart image is:
+--[ RSA 2048]----+
|        +.       |
|       . +       |
|        o +      |
|       . + o     |
|        S .      |
|         .       |
|        .. . .   |
|       .  +==o  E|
|      ....=O* .. |
+-----------------+

user@pc:~$ ls ~/.ssh/
id_rsa  id_rsa.pub

user@pc:~$ cat ~/.ssh/id_rsa.pub
ssh-rsa AAAAB3NzaC1yc2EAAAADAQABAAABAQCvO5swUgdzu/cLDf44R90OUrd32lScJtnI+hujpRh9WwZnYiFE/0M+DymrMzYe2UF65pA4T0rai5tUnnQ4K5a1rwM1qeXoe/
JZPPZ+U3sn5KDh2iMlVwAUT00jubAi8mYjHC1eT1ZqpprrM0hsoj7BavXRjut737W9kp4cwt7zA6wGB3zemv7fLUJnriOA1DrAYis9kWqJLvEca0hW1Hbd0e9rvUajwoKAQPJr
SSK+GFEaKZ/kbWCumUy4BXStGhrNt/+OABT1d9WXtfUi/AeKkYXZWjy/PO1hvtooeWw1VYT0htiKkAox9UellVxpK/ARmQYjlNyVIL/D9HlYMjCd user@pc
3) Login in IoT-LAB Web Interface
- Access https://www.iot-lab.info/testbed/, login or create an account.

4) Append your SSH key into your profile
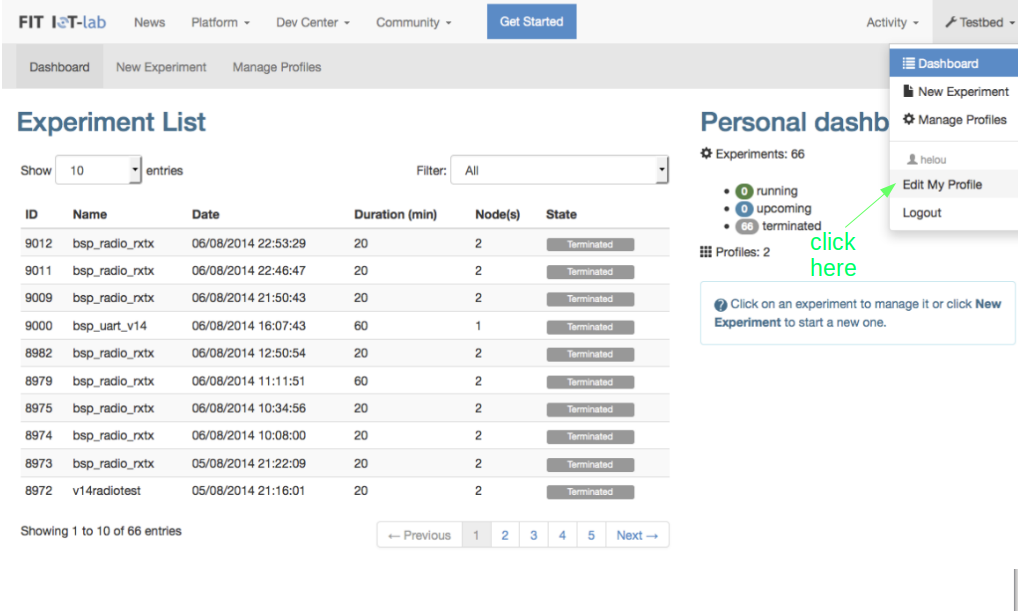
4.1) In the upper right corner, pass the mouse in "Testbed" and select "Edit My Profile"
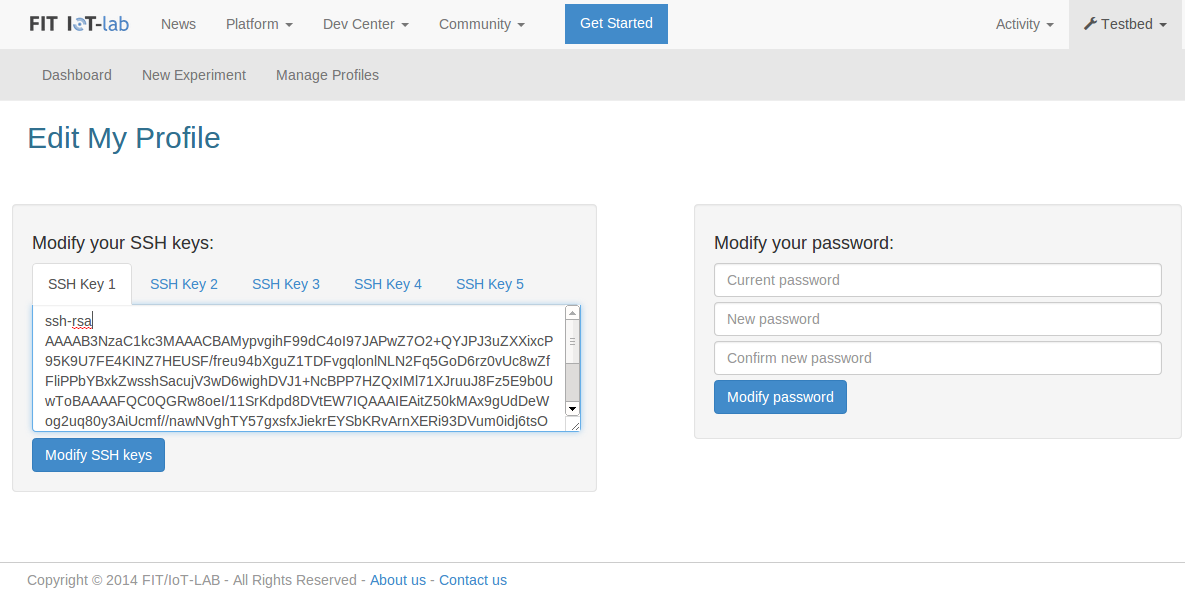
4.2) Copy-paste the generated key to the "SSH key" field and click "Modify SSH keys"
5) Create a new experiment
5.1) Pass the mouse in "Testbed", and click "New Experiment". The following window will appear.
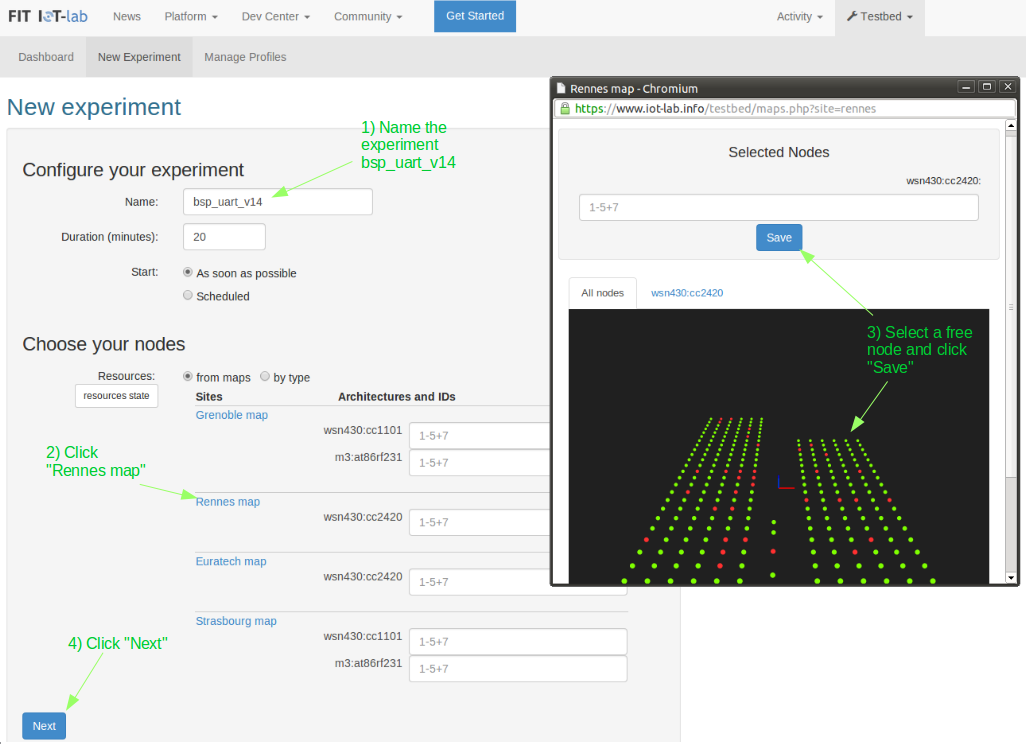
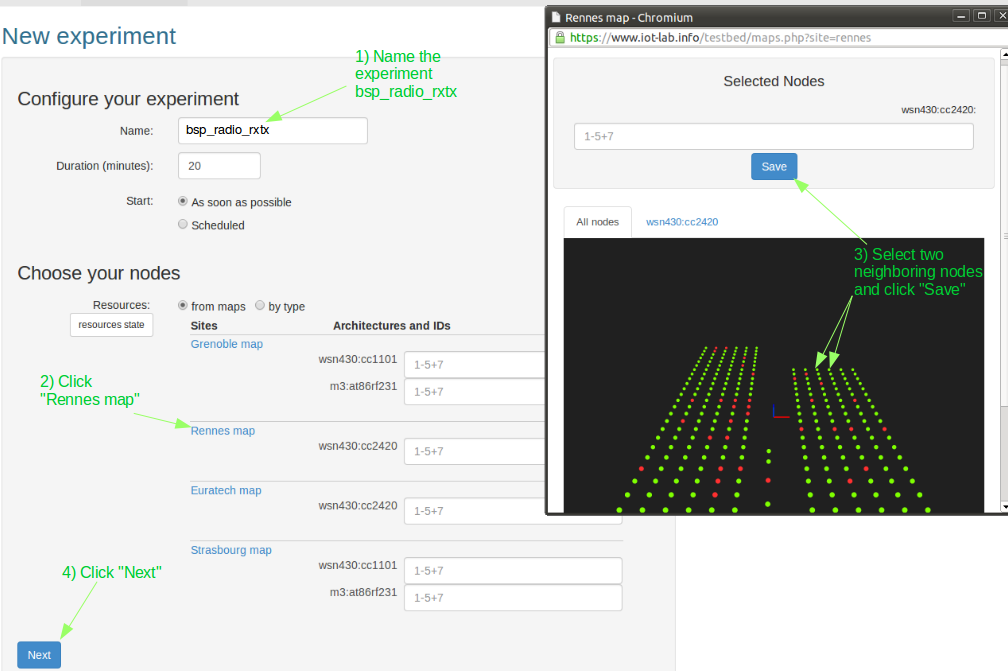
- Name your experiment "
bsp_uart_v14" - Click "Rennes Map" to open the map window
- The three types of motes are distributed in the six sites. We choose Rennes, where there are WSN430-v14 nodes.
- Select a free node and click "Save"
- Click "Next"
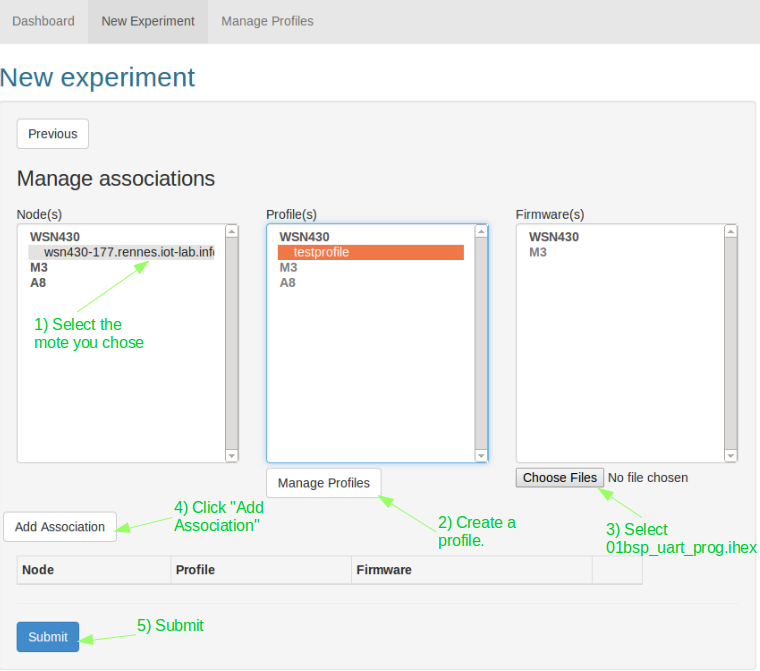
5.2) Set your experiment
- Select the mote
- Create a profile (don't need to change any settings)
Choose the file you built in "1) Build Firmware", located at
openwsn/openwsn-fw/firmware/openos/projects/common/01bsp_uart_prog.ihex- Add Association
- Submit
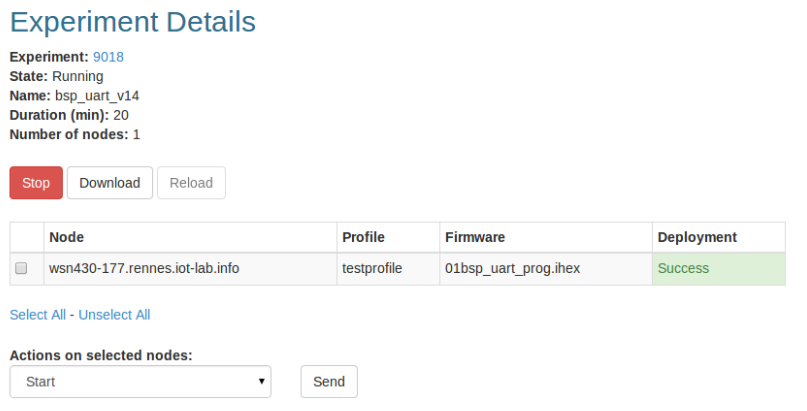
- After submitting, your screen should appear like this:
6) Access the site server
6.1) Access Rennes server with SSH
user@pc:~$ ssh user@rennes.iot-lab.info
Linux rennes 2.6.32-5-amd64 #1 SMP Sun May 6 04:00:17 UTC 2012 x86_64
Welcome FIT IoT-LAB users
Charter:
* FIT IoT-LAB is shared among several users, so do a reasonable use of the platform
* Quote FIT IoT-LAB in your scientific papers
Post your issues on:
* the user mailing-list: users@iot-lab.info
* or the bug-tracker: https://github.com/iot-lab/iot-lab/issues
Last login: Wed Aug  6 21:51:17 2014 from 213-245-14-123.rev.numericable.fr
user@rennes:~$
6.2) Access the chosen mote via NetCat
- "Hello, World!" should be printed in your terminal periodically.
- Whenever you enter a character, the board echoes it back
user@rennes:~$ nc wsn430-<moteID> 20000
Hello, World!
openwsn
openwsn
Hello, World!
Hello, World!
c
c
Hello, World!
Hello, World!
Hello, World!
iotlab
iotlab
Testing the Radio
In this application, we will use two motes. One of them will run the TX, and the other will run the RX. Each 500ms, the TX will send a packet in the air. The RX will listen to these packets and write in its serial interface the length, number, RSSI, LQI and CRC of each packet.
- To test the radio, we will:
- Build two firmwares
- Login in IoT-LAB Web Interface
- Create a new experiment with two neighboring motes
3.1 Load the firmwares - Access the server-site
- Download openwsn-fw repository
- Compile and run a parser script created by Thomas Watteyne
6.1 Receive transmission information from RX mote
1) Build firmwares
user@pc:~$ cd Desktop/openwsn/openwsn-fw
user@pc:~/Desktop/openwsn/openwsn-fw$ sudo scons board=wsn430v14 toolchain=mspgcc bsp_radio_rx
[sudo] password for user:
scons: Reading SConscript files ...
 ___                 _ _ _  ___  _ _
| . | ___  ___ ._ _ | | | |/ __>| \ |
| | || . \/ ._>| ' || | | |\__ \|   |
`___'|  _/\___.|_|_||__/_/ <___/|_\_|
     |_|                  openwsn.org
scons: done reading SConscript files.
scons: Building targets ...
msp430-size firmware/openos/projects/common/01bsp_radio_rx_prog
   text	   data	    bss	    dec	    hex	filename
   3198	      0	    186	   3384	    d38	firmware/openos/projects/common/01bsp_radio_rx_prog
scons: done building targets.
user@pc:~/Desktop/openwsn/openwsn-fw$ sudo scons board=wsn430v14 toolchain=mspgcc bsp_radio_tx
scons: Reading SConscript files ...
 ___                 _ _ _  ___  _ _
| . | ___  ___ ._ _ | | | |/ __>| \ |
| | || . \/ ._>| ' || | | |\__ \|   |
`___'|  _/\___.|_|_||__/_/ <___/|_\_|
     |_|                  openwsn.org
scons: done reading SConscript files.
scons: Building targets ...
msp430-size firmware/openos/projects/common/01bsp_radio_tx_prog
   text	   data	    bss	    dec	    hex	filename
   3078	      0	    172	   3250	    cb2	firmware/openos/projects/common/01bsp_radio_tx_prog
scons: done building targets.
For debugging:
2) Login in IoT-LAB Web Interface
3) Create a New Experiment
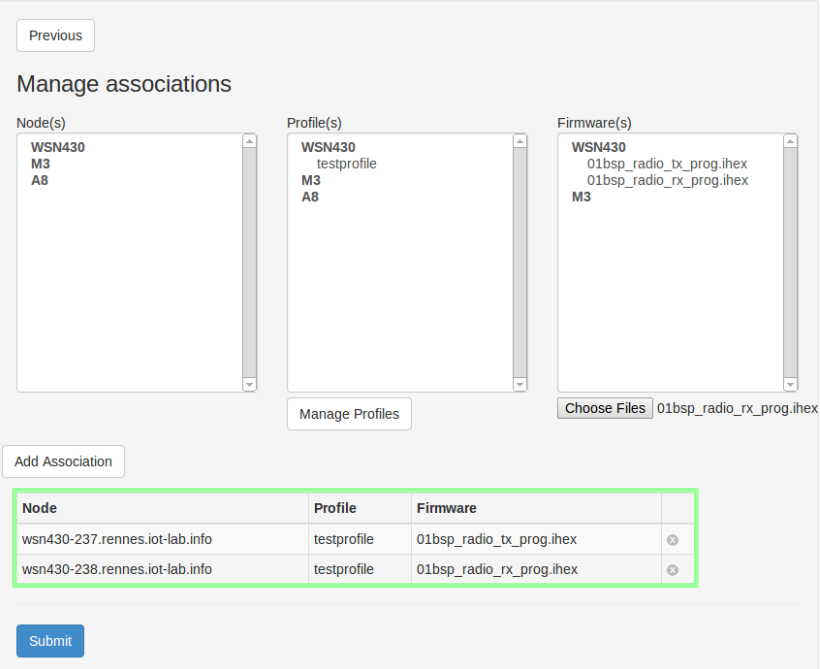
3.1) Load 01bsp_radio_rx_prog.ihex in a mote and 01bsp_radio_tx_prog.ihex in the other
- After firmwares are selected correctly for each mote, click "Submit"
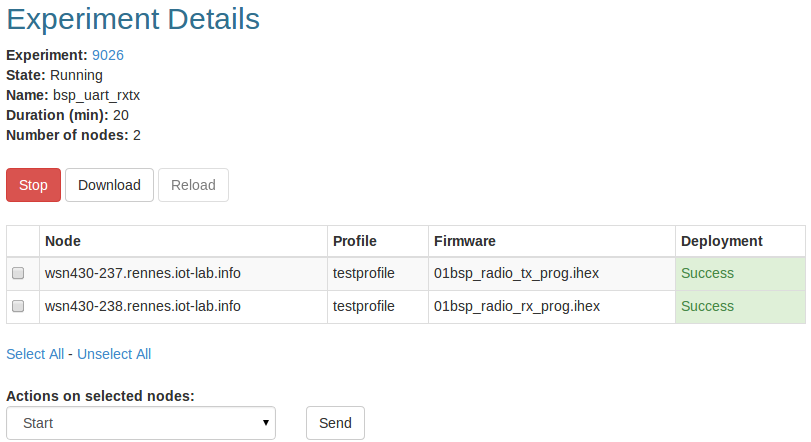
- After "Submit", your screen should be like this:
4) Access Rennes server
user@pc:~$ ssh user@rennes.iot-lab.info
Linux rennes 2.6.32-5-amd64 #1 SMP Sun May 6 04:00:17 UTC 2012 x86_64
Welcome FIT IoT-LAB users
Charter:
* FIT IoT-LAB is shared among several users, so do a reasonable use of the platform
* Quote FIT IoT-LAB in your scientific papers
Post your issues on:
* the user mailing-list: users@iot-lab.info
* or the bug-tracker: https://github.com/iot-lab/iot-lab/issues
Last login: Wed Aug  6 21:51:17 2014 from 213-245-14-123.rev.numericable.fr
user@rennes:~$
5) Download openwsn-fw on Server
- The parser script's goal is to parse the packets and show them in a way humans can read. TX transmits arbitrary bytes thru the air, and not all of them have a corresponding character in ASCII table. Without it, the printed line in the terminal cannot be read.
- It is located at openwsn-fw GitHub repository, so we need to clone it in server.
user@rennes:~$ mkdir openwsn
user@rennes:~$ cd openwsn
user@rennes:~/openwsn$ git clone https://github.com/openwsn-berkeley/openwsn-fw.git
...
user@rennes:~/openwsn$
6) Compile and run the parser script 01bsp_radio_rx.py
Navigate into the directory
- Compile the script
- Answer "
y" - Input the mote ID
- Receive information from RX mote
"
moteID" must be the number of the mote running01bsp_radio_rx_prog.ihex
user@rennes:~/openwsn$ cd openwsn-fw/firmware/openos/projects/common/01bsp_radio_rx
user@rennes:~/openwsn/openwsn-fw/firmware/openos/projects/common/01bsp_radio_rx$ python 01bsp_radio_rx.py

 ___                 _ _ _  ___  _ _
| . | ___  ___ ._ _ | | | |/ __>| \ |
| | || . \/ ._>| ' || | | |\__ \|   |
`___'|  _/\___.|_|_||__/_/ <___/|_\_|
     |_|                  openwsn.org
running IoT-lAB? (Y|N): Y
motename? (e.g. wsn430-35): wsn430-<moteID>
len=127 num=0   rssi=-56  lqi=107 crc=1
len=127 num=1   rssi=-56  lqi=105 crc=1
len=127 num=2   rssi=-56  lqi=106 crc=1
len=127 num=3   rssi=-56  lqi=107 crc=1
len=127 num=4   rssi=-56  lqi=108 crc=1
len=127 num=5   rssi=-56  lqi=107 crc=1
len=127 num=6   rssi=-56  lqi=107 crc=1
len=127 num=7   rssi=-56  lqi=106 crc=1
len=127 num=8   rssi=-56  lqi=108 crc=1
len=127 num=9   rssi=-56  lqi=107 crc=1
...