...
Frankly, it's a bit strange to start using OpenWSN with a simulation, since the firmware is really meant (and written) to run on real motes. But, not everyone has hardware, not always the same hardware, etc. So to make things nice and easy, we'll start by simulation. Oh, and the simulated code behaves exactly the same as the real code, so what you see now is what you'll get with real hardware.
Prepare
Before we can start running a simulation, we need to compile the firmware as a Python extension. This is all explained in the OpenSim page if you want to know what's going on.
...
| Tip | ||||||||||||||||||||||||||||||
|---|---|---|---|---|---|---|---|---|---|---|---|---|---|---|---|---|---|---|---|---|---|---|---|---|---|---|---|---|---|---|
| ||||||||||||||||||||||||||||||
Before you can go on, you need to install Python:
|
To compile the firmware as a Python extension module, type:
| Code Block | ||
|---|---|---|
| ||
C:\Users\Thomas\Desktop\openwsn-fw>scons board=python toolchain=gcc oos_openwsn
scons: Reading SConscript files ...
 ___                 _ _ _  ___  _ _
| . | ___  ___ ._ _ | | | |/ __>| \ |
| | || . \/ ._>| ' || | | |\__ \|   |
`___'|  _/\___.|_|_||__/_/ <___/|_\_|
     |_|                  openwsn.org
[...]
gcc -shared -o firmware\openos\projects\common\oos_openwsn.pyd firmware\openos\projects\common\03oos_openwsn\03oos_openw
sn_obj.o firmware\openos\bsp\boards\python\openwsnmodule_obj.o -LC:\Python27\libs -Lbuild\python_gcc\bsp\boards\python -
Lbuild\python_gcc\kernel\openos -Lbuild\python_gcc\drivers -Lbuild\python_gcc\openwsn -lopenstack -lopenos -ldrivers -lb
sp -lpython27 -Wl,--out-implib,firmware\openos\projects\common\liboos_openwsn.a
scons: done building targets. |
This step compile the complete OpenWSN firmware as a Python extension module (a form of shared library) which the simulation environment can import at run-time.
The extension module is at openwsn-fw\firmware\openos\projects\common\oos_openwsn.pyd, no need to move it.
Simulate
You can now start a simulation. Running a simulation just means taking the usual software which runs on your computer (and call "openvisualizer"), but running it in simulation mode. That is, instead of the openvisualizer connecting to real motes, it connects to emulated mote code actually running on you machine.
| Tip | ||
|---|---|---|
| ||
Before you can go on, you need to install a TAP virtual interface:
|
Start a simulation:
| Code Block | ||
|---|---|---|
| ||
C:\Users\Thomas\Desktop\openwsn-sw\software\openvisualizer>scons runweb --sim scons: Reading SConscript files ... ___ _ _ _ ___ _ _ | . | ___ ___ ._ _ | | | |/ __>| \ | | | || . \/ ._>| ' || | | |\__ \| | `___'| _/\___.|_|_||__/_/ <___/|_\_| |_| openwsn.org scons: done reading SConscript files. scons: Building targets ... Copy("bin\openVisualizerApp\sim_files", "..\..\..\openwsn-fw\firmware\openos\bsp\boards\python\openwsnmodule_obj.h") Mkdir("bin\openVisualizerApp\sim_files\windows") Copy("bin\openVisualizerApp\sim_files\windows\oos_openwsn-x86.pyd", "..\..\..\openwsn-fw\firmware\openos\projects\common \oos_openwsn.pyd") Copy("bin\openVisualizerApp\sim_files", "..\..\..\openwsn-fw\firmware\openos\projects\common\oos_openwsn.pyd") Delete("build\runui\web_files") Mkdir("C:\Users\Thomas\Desktop\openwsn-sw\software\openvisualizer\build\runui") Copy("build\runui\web_files", "bin\openVisualizerApp\web_files") Delete("build\runui\sim_files") Mkdir("C:\Users\Thomas\Desktop\openwsn-sw\software\openvisualizer\build\runui") Copy("build\runui\sim_files", "bin\openVisualizerApp\sim_files") uiRunner(["bin\openVisualizerApp\openVisualizerWeb"], ["bin\openVisualizerApp\openVisualizerWeb.py"]) Child PID is 2692 scons: done building targets. |
That's it, an OpenWSN simulation is now running your computer!
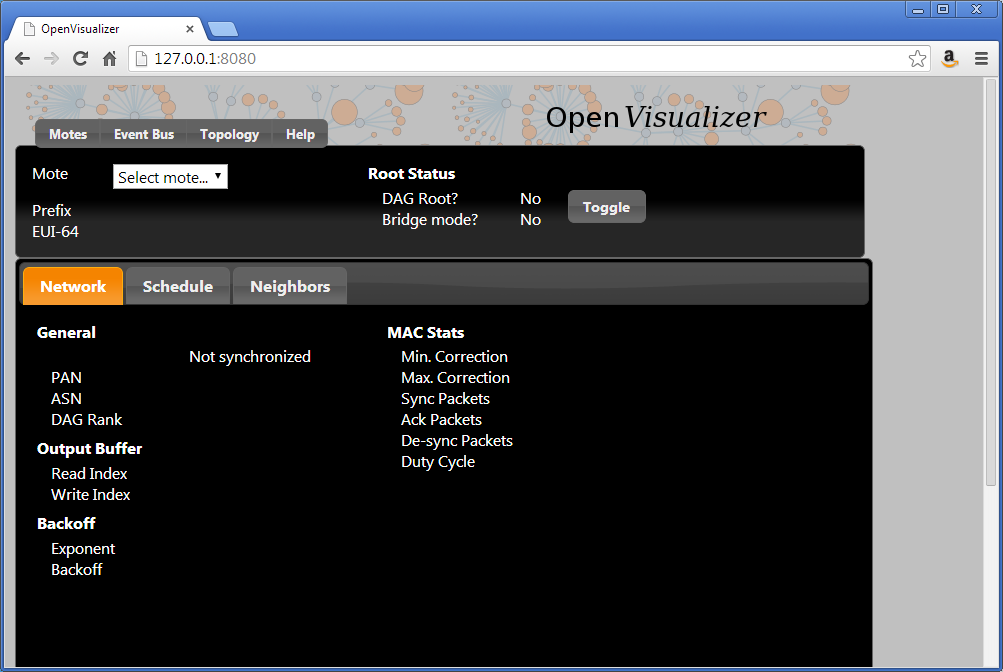
Open http://127.0.0.1:8080/ to see the web interface of OpenWSN.
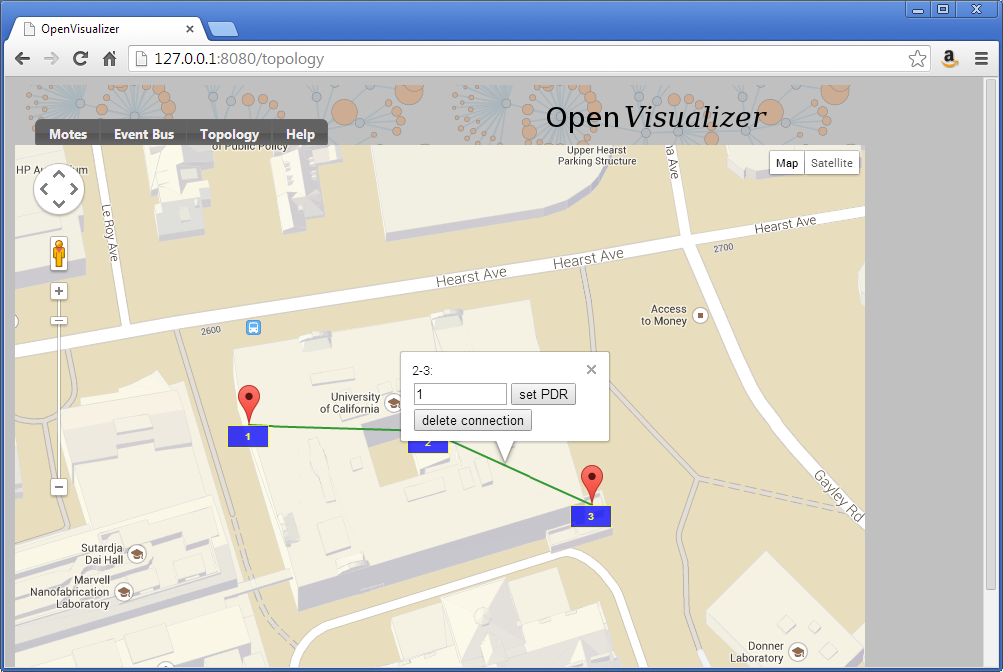
Open the "Topology" tab:
- left click on a mote to move it around
- right-click on two motes to connect them with a wireless link
- left-click on a link to change its PDR (packet delivery ratio)
Set up the topology to have a chain 1-2-3, and set each PDR to 1.
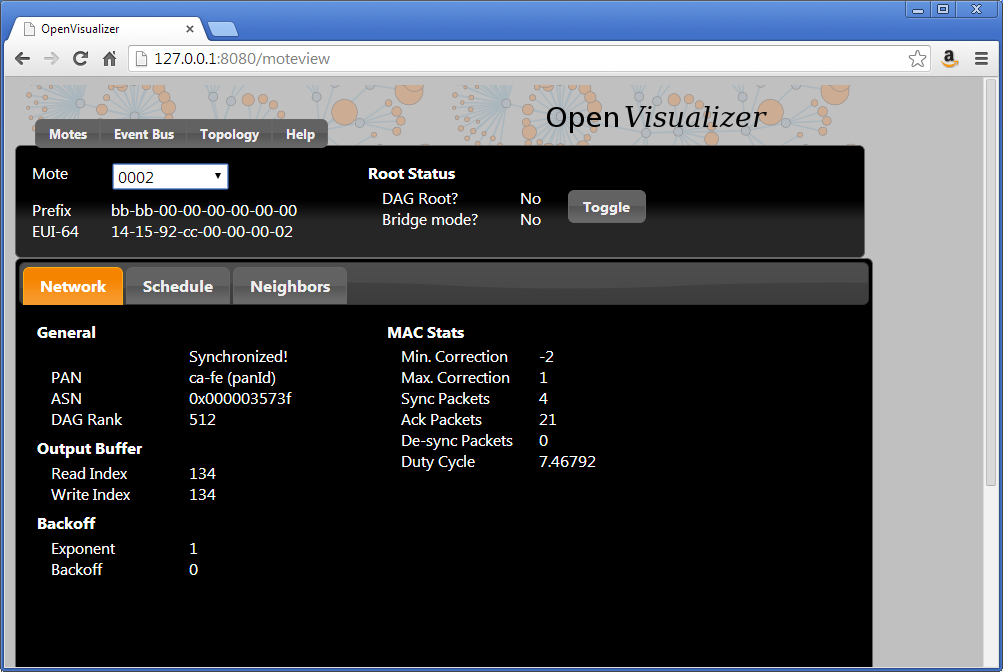
Back in the "Motes" tab, select mote 0001 and click on the "Toggle" button. You just declare mote 1 to be the root of your network (the DAGroot in RPL parlance, the sink in WSN parlance, the gateway, etc). You can select other motes and see that they quickly become "Synchronized!".
Congratulations, you have built your first OpenWSN simulated network!
Ping a mote
By convention (i.e. this is hard-coded in the software), the IPv6 prefix of the simulated network is bbbb:/64. This means that the IPv6 address of each mote will start with "bbbb::". The remainder of a mote's IPv6 address is it's MAC address (or EUI-64). You can read this in the web interface (under "EUI-64").
Open a new command prompt to ping mote 2:
| Code Block | ||
|---|---|---|
| ||
C:\Users\Thomas>ping bbbb::1415:92cc:0:2


Pinging bbbb::1415:92cc:0:2 with 32 bytes of data:
Reply from bbbb::1415:92cc:0:2: time=101ms
Reply from bbbb::1415:92cc:0:2: time=67ms
Reply from bbbb::1415:92cc:0:2: time=97ms
Reply from bbbb::1415:92cc:0:2: time=91ms


Ping statistics for bbbb::1415:92cc:0:2:
    Packets: Sent = 4, Received = 4, Lost = 0 (0% loss),
Approximate round trip times in milli-seconds:
Minimum = 67ms, Maximum = 101ms, Average = 89ms |
You can also ping mote 3 which is 3 hops away:
| Code Block | ||
|---|---|---|
| ||
C:\Users\Thomas>ping bbbb::1415:92cc:0:3


Pinging bbbb::1415:92cc:0:3 with 32 bytes of data:
Reply from bbbb::1415:92cc:0:3: time=206ms
Reply from bbbb::1415:92cc:0:3: time=95ms
Reply from bbbb::1415:92cc:0:3: time=153ms
Reply from bbbb::1415:92cc:0:3: time=76ms


Ping statistics for bbbb::1415:92cc:0:3:
    Packets: Sent = 4, Received = 4, Lost = 0 (0% loss),
Approximate round trip times in milli-seconds:
Minimum = 76ms, Maximum = 206ms, Average = 132ms |