| Warning |
|---|
This pager is under construction. To get things moving faster, contact Thomas Watteyne. |
If you are completely new to OpenWSN, and you are using Windows, read this page first. It will walk you through all the steps to install OpenWSN and explore a number of key features.
...
| Info | ||
|---|---|---|
| ||
|
| Table of Contents | ||
|---|---|---|
|
Download OpenWSN
OpenWSN is a collection of repositories hosted on GitHub. We will download and use the following:
...
...
| Note |
|---|
At the time of writing, we are using the latest and greatest of all software. Undoubtedly, this will become outdated very fast. If you see something out of the date, take action! Send an e-mail to Tengfei Chang or Thomas Watteyne to get this page update. Thanks! |
| Warning |
|---|
During this tutorial, you will be installing a number of tools (python, pywin32, mingw). We recommend you install the 32-bit version of all of these tools, even you have a 64-bit machine. |
| Table of Contents | ||
|---|---|---|
|
Download OpenWSN
OpenWSN is a collection of repositories hosted on GitHub. We will download and use the following:
- https://github.com/openwsn-berkeley/openwsn-fw holds the firmware source code which runs on the (possibly emulated) motes
- https://github.com/openwsn-berkeley/coap is a Python module which implements CoAP
...
- openvisualizer holds the software source code which runs on your computer
- https://github.com/openwsn-berkeley/coap is a Python module which implements CoAP
| Tip | ||
|---|---|---|
| ||
Before you can go on, you need to install a Git client. Any client will do, but we will use tortoisegit. Once you've installed it, it will integrate nicely with your Windows explorer. |
...
- right-click on your Desktop, select TortoiseGit > Clone... .
- In the URL, enter https://github.com/openwsn-berkeley/openwsn-fw.git
- repeat for the following URLs:
...
| Tip | |||||||||||
|---|---|---|---|---|---|---|---|---|---|---|---|
| |||||||||||
Before you can go on, you need to install
|
| Tip | ||||||||||||||||||||||||||||||||||||||||||||
|---|---|---|---|---|---|---|---|---|---|---|---|---|---|---|---|---|---|---|---|---|---|---|---|---|---|---|---|---|---|---|---|---|---|---|---|---|---|---|---|---|---|---|---|---|
| ||||||||||||||||||||||||||||||||||||||||||||
Before you can go on, you need to install Python:
|
To compile the firmware as a Python extension module, type:
| Code Block | ||
|---|---|---|
| ||
C:\Users\ThomasTengfei\Desktop\openwsn-fw>scons board=python toolchain=gcc oos_openwsn scons: Reading SConscript files ... ___ _ _ _ ___ _ _ | . | ___ ___ ._ _ | | | |/ __>| \ | | | || . \/ ._>| ' || | | |\__ \| | `___'| _/\___.|_|_||__/_/ <___/|_\_| |_| openwsn.org [...] gcc -shared -o firmware\openosArchiving build\python_gcc\bsp\boards\libbsp.a Indexing build\python_gcc\bsp\boards\libbsp.a gcc -shared -o build\python_gcc\projects\common\oos_openwsn.pyd firmwarebuild\openospython_gcc\projects\common\03oos03o os_openwsn\03oos_openw snopenwsn_obj.o firmwarebuild\openospython_gcc\bspprojects\boardscommon\python03oos_openwsn\openwsnmodule_obj.o -LCL C:\Python27\libs -Lbuild\python_gcc\bsp\boards\python - Lbuild\python_gcc\kernel\openos -Lbuild\python_gcc\d rivers -Lbuild\python_gcc\driversopenstack -Lbuild\python_gcc\openwsnopenapps -lopenstack -lopenoslopenapps -ldriverslkernel -lb spldr ivers -lbsp -lpython27 -Wl,--out-implib,firmwarebuild\openospython_gcc\projects\common\liboos_openwsn.a scons: done building targets. |
This step compile the complete OpenWSN firmware as a Python extension module (a form of shared library) which the simulation environment can import at run-time.
The extension module is at openwsn-fw\firmware\openos\projects\common\oos_openwsn.pyd, no need to move it.
Simulate
You can now start a simulation. Running a simulation just means taking the usual software which runs on your computer (and call "openvisualizer"), but running it in simulation mode. That is, instead of the openvisualizer connecting to real motes, it connects to emulated mote code actually running on you machine.
| Tip | ||
|---|---|---|
| ||
Before you can go on, you need to install a TAP virtual interface:
|
Start a simulation:
| Code Block | ||
|---|---|---|
| ||
C:\Users\Thomas\Desktop\openwsn-sw\software\openvisualizer>scons runweb --sim
scons: Reading SConscript files ...
 ___                 _ _ _  ___  _ _
| . | ___  ___ ._ _ | | | |/ __>| \ |
| | || . \/ ._>| ' || | | |\__ \|   |
`___'|  _/\___.|_|_||__/_/ <___/|_\_|
     |_|                  openwsn.org
scons: done reading SConscript files.
scons: Building targets ...
Copy("bin\openVisualizerApp\sim_files", "..\..\..\openwsn-fw\firmware\openos\bsp\boards\python\openwsnmodule_obj.h")
Mkdir("bin\openVisualizerApp\sim_files\windows")
Copy("bin\openVisualizerApp\sim_files\windows\oos_openwsn-x86.pyd", "..\..\..\openwsn-fw\firmware\openos\projects\common
\oos_openwsn.pyd")
Copy("bin\openVisualizerApp\sim_files", "..\..\..\openwsn-fw\firmware\openos\projects\common\oos_openwsn.pyd")
Delete("build\runui\web_files")
Mkdir("C:\Users\Thomas\Desktop\openwsn-sw\software\openvisualizer\build\runui")
Copy("build\runui\web_files", "bin\openVisualizerApp\web_files")
Delete("build\runui\sim_files")
Mkdir("C:\Users\Thomas\Desktop\openwsn-sw\software\openvisualizer\build\runui")
Copy("build\runui\sim_files", "bin\openVisualizerApp\sim_files")
uiRunner(["bin\openVisualizerApp\openVisualizerWeb"], ["bin\openVisualizerApp\openVisualizerWeb.py"])
Child PID is 2692
scons: done building targets. |
That's it, an OpenWSN simulation is now running your computer!
Open http://127.0.0.1:8080/ to see the web interface of OpenWSN.
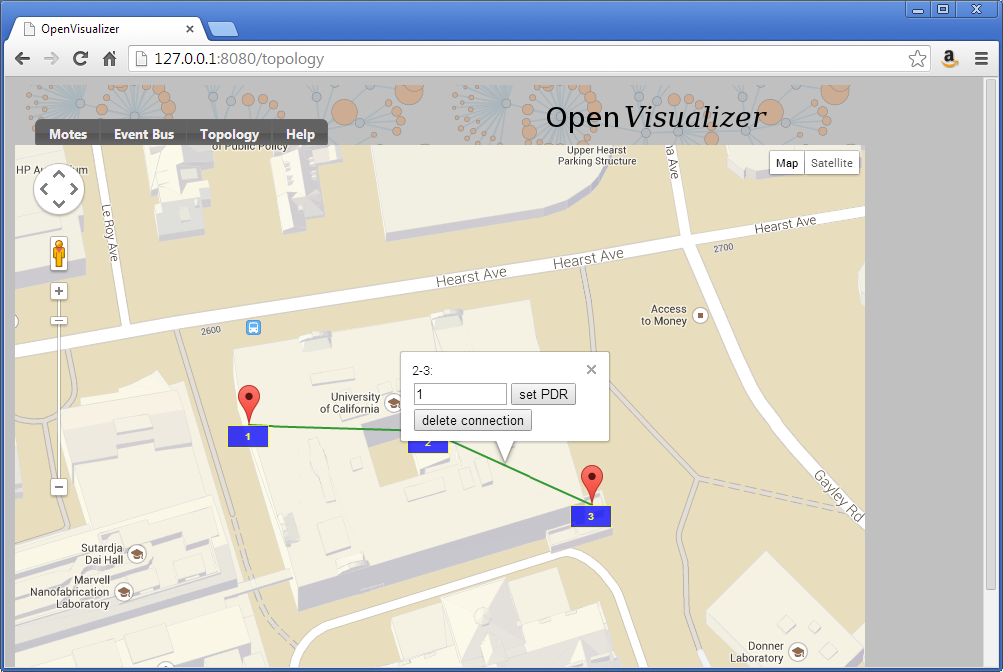
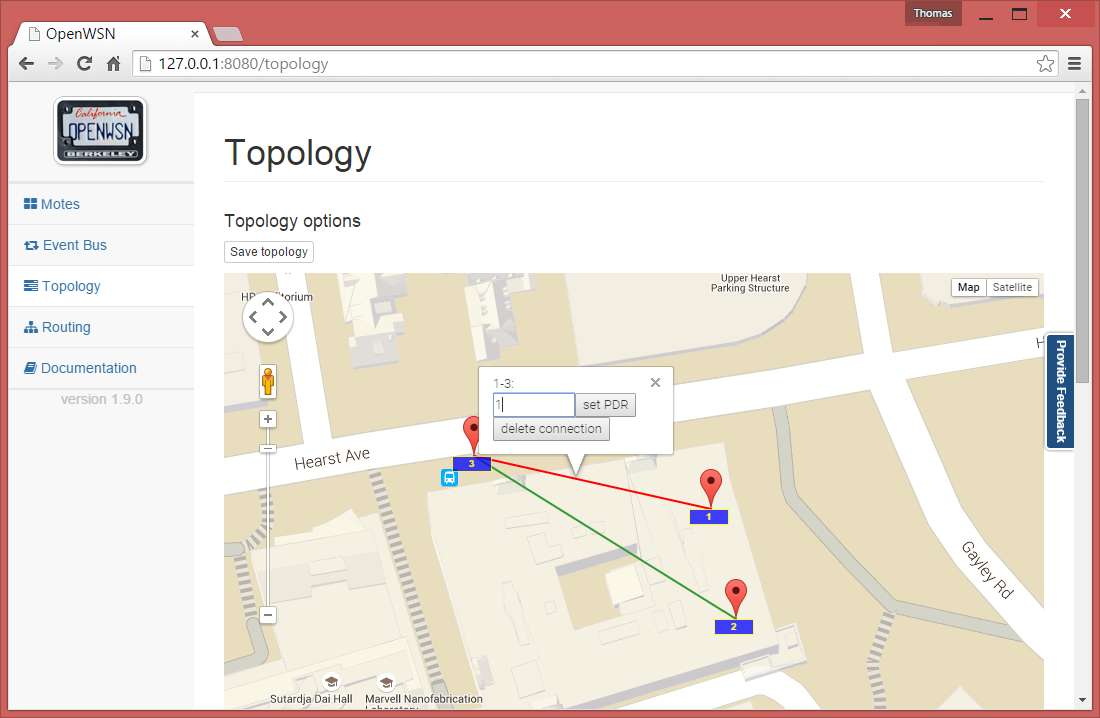
Open the "Topology" tab:
- left click on a mote to move it around
- right-click on two motes to connect them with a wireless link
- left-click on a link to change its PDR (packet delivery ratio)
Set up the topology to have a chain 1-2-3, and set each PDR to 1.
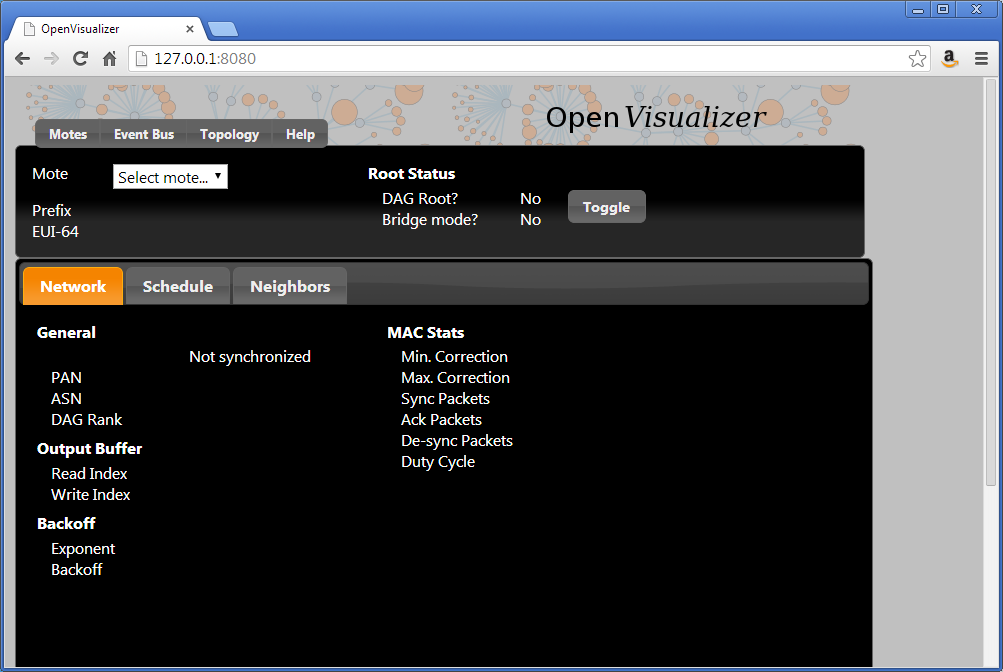
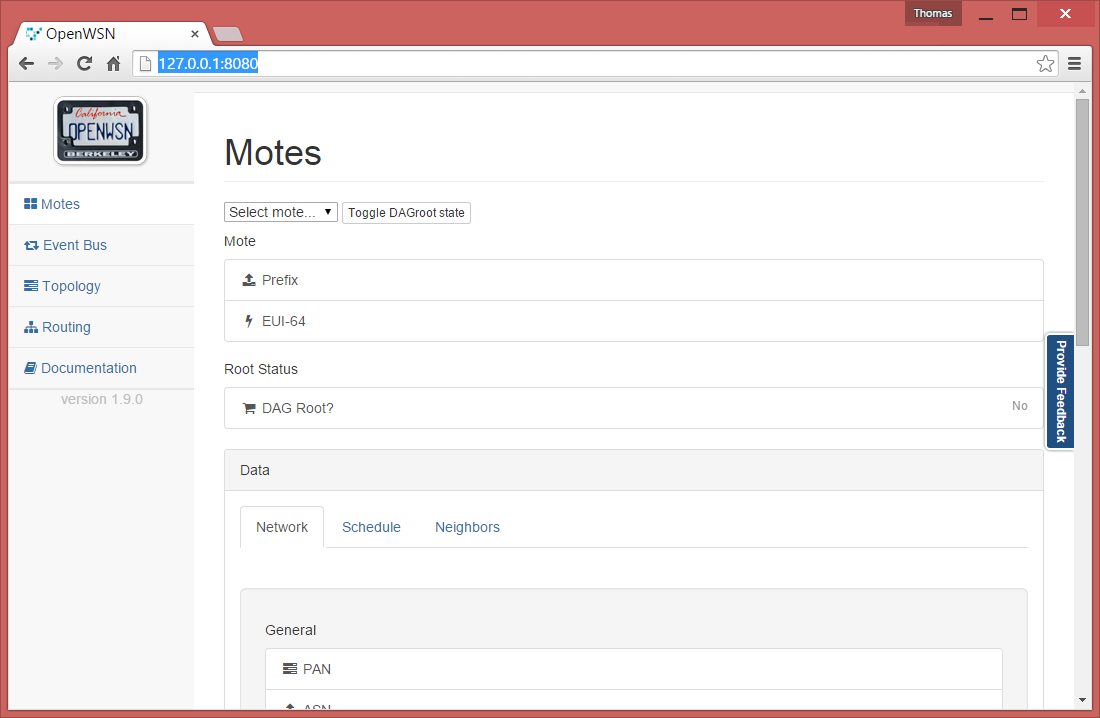
Back in the "Motes" tab, select mote 0001 and click on the "Toggle" button. You just declare mote 1 to be the root of your network (the DAGroot in RPL parlance, the sink in WSN parlance, the gateway, etc). You can select other motes and see that they quickly become "Synchronized!".
Congratulations, you have built your first OpenWSN simulated network!
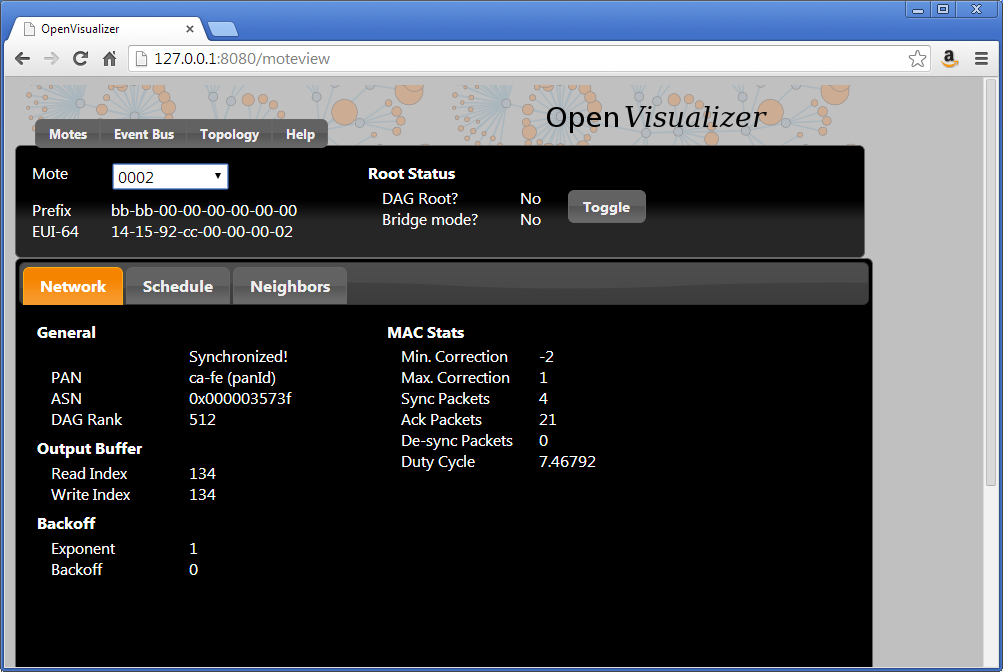
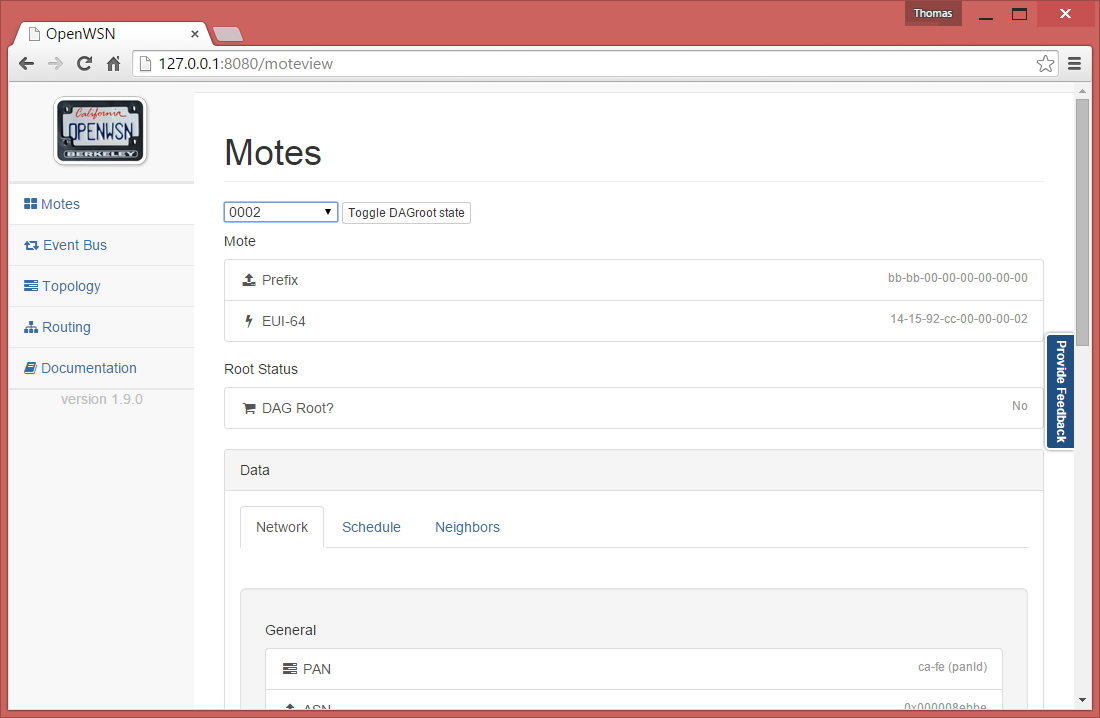
Ping a mote
By convention (i.e. this is hard-coded in the software), the IPv6 prefix of the simulated network is bbbb:/64. This means that the IPv6 address of each mote will start with "bbbb::". The remainder of a mote's IPv6 address is it's MAC address (or EUI-64). You can read this in the web interface (under "EUI-64").
Open a new command prompt to ping mote 2:
| Code Block | ||
|---|---|---|
| ||
C:\Users\Thomas>ping bbbb::1415:92cc:0:2


Pinging bbbb::1415:92cc:0:2 with 32 bytes of data:
Reply from bbbb::1415:92cc:0:2: time=101ms
Reply from bbbb::1415:92cc:0:2: time=67ms
Reply from bbbb::1415:92cc:0:2: time=97ms
Reply from bbbb::1415:92cc:0:2: time=91ms


Ping statistics for bbbb::1415:92cc:0:2:
    Packets: Sent = 4, Received = 4, Lost = 0 (0% loss),
Approximate round trip times in milli-seconds:
Minimum = 67ms, Maximum = 101ms, Average = 89ms |
You can also ping mote 3 which is 3 hops away:
| Code Block | ||
|---|---|---|
| ||
C:\Users\Thomas>ping bbbb::1415:92cc:0:3

Pinging bbbb::1415:92cc:0:3 with 32 bytes of data:
Reply from bbbb::1415:92cc:0:3: time=206ms
Reply from bbbb::1415:92cc:0:3: time=95ms
Reply from bbbb::1415:92cc:0:3: time=153ms
Reply from bbbb::1415:92cc:0:3: time=76ms

Ping statistics for bbbb::1415:92cc:0:3:
    Packets: Sent = 4, Received = 4, Lost = 0 (0% loss),
Approximate round trip times in milli-seconds:
Minimum = 76ms, Maximum = 206ms, Average = 132ms |
Interact over CoAP
CoAP is a protocol implement on each OpenWSN device, which makes it appear like a web server on the Internet.
By default, an OpenWSN mote implements a CoAP "info" resource which indicate what version of the code is running. You can test that by running the Python test script provided in the firmware:
| Code Block | ||
|---|---|---|
| ||
C:\Users\Thomas\Desktop\openwsn-fw\firmware\openos\openwsn\07-App\rinfo
OpenWSN 1.4.1
Python
Python
Python
Done. Press enter to close. |
Debugging with Wireshark
In simulation mode, the openvisualizer takes care of simulating the wireless medium. You can use Wireshark to take a peek at what goes over this simulated radio space.
| Tip | ||
|---|---|---|
| ||
Before you can go on, you need to install Wireshark:
|
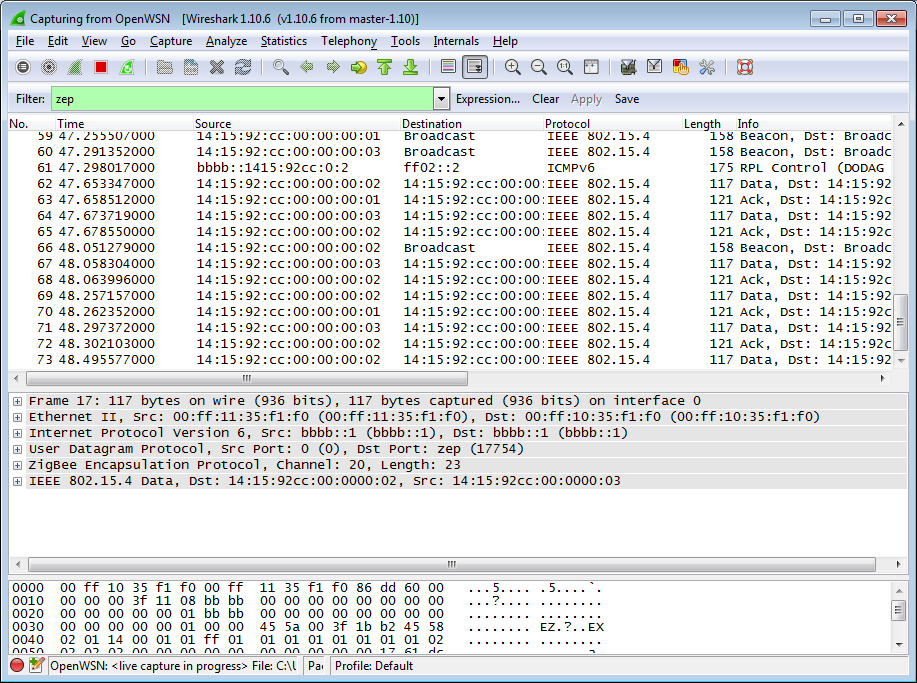
Start Wireshark on the OpenWSN interface at address, and configure the filtering for zep (the ZigBee encapsulation protocol).
For now, you don't see any packets, that's normal:
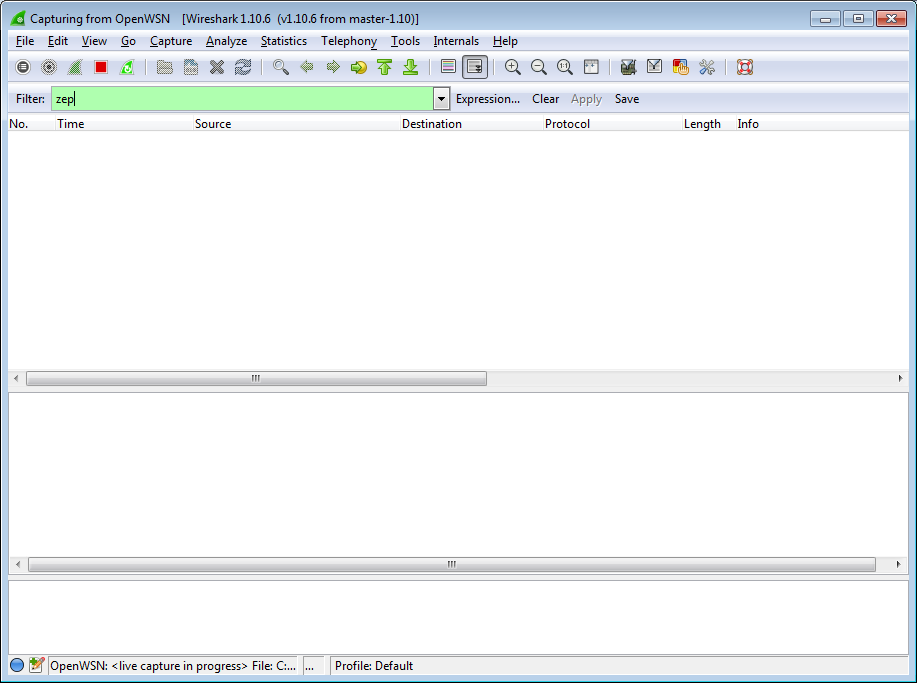
In the OpenVisualizer's "Event bus" tab, check the "Wireshark debug" box.
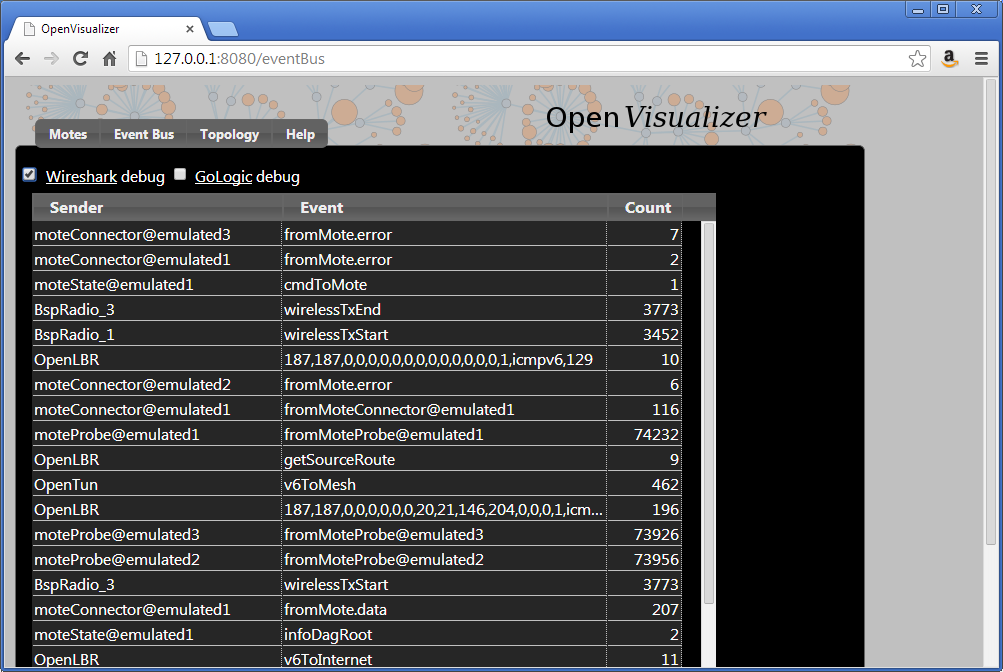
You now see all the packets exchanged over the simulated radio environment, exciting!
Closing the OpenVisualizer
Now the embarrassing part. We haven't taken the time to implement a graceful way of stopping the openvisualizer, so you'll have to kill the process. Sorry.

Now with real hardware
User experience with real hardware is identical than when using the simulator. Because it is a popular platform, we will use the TelosB mote, although any other supported hardware platform can be used instead.
Connecting the boards
| Tip | ||
|---|---|---|
| ||
| Expand | ||
| ||
|
This step compile the complete OpenWSN firmware as a Python extension module (a form of shared library) which the simulation environment can import at run-time.
The extension module is at openwsn-fw\build\python_gcc\projects\common\oos_openwsn.pyd, no need to move it.
Simulate
You can now start a simulation. Running a simulation just means taking the usual software which runs on your computer (and call "openvisualizer"), but running it in simulation mode. That is, instead of the openvisualizer connecting to real motes, it connects to emulated mote code actually running on your machine.
| Tip | ||
|---|---|---|
| ||
Before you can go on, you need to install a TAP virtual interface:
|
Start a simulation:
| Code Block | ||
|---|---|---|
| ||
C:\Users\Tengfei\Desktop\openvisualizer>scons runweb --sim
scons: Reading SConscript files ...
 ___                 _ _ _  ___  _ _
| . | ___  ___ ._ _ | | | |/ __>| \ |
| | || . \/ ._>| ' || | | |\__ \|   |
`___'|  _/\___.|_|_||__/_/ <___/|_\_|
     |_|                  openwsn.org
scons: done reading SConscript files.
scons: Building targets ...
Copy("bin\sim_files", "..\openwsn-fw\bsp\boards\python\openwsnmodule_obj.h")
Mkdir("bin\sim_files\windows")
Copy("bin\sim_files\windows\oos_openwsn-x86.pyd", "..\openwsn-fw\build\python_gcc\projects\common\oos_openwsn.pyd")
Copy("bin\sim_files", "..\openwsn-fw\build\python_gcc\projects\common\oos_openwsn.pyd")
Delete("build\runui\web_files")
Mkdir("C:\Users\Tengfei\Desktop\openvisualizer\build\runui")
Copy("build\runui\web_files", "bin\web_files")
Delete("build\runui\sim_files")
Mkdir("C:\Users\Tengfei\Desktop\openvisualizer\build\runui")
Copy("build\runui\sim_files", "bin\sim_files")
uiRunner(["bin\openVisualizerWeb"], ["bin\openVisualizerWeb.py"])
10:46:15 INFO create instance
10:46:15 INFO create instance
10:46:15 INFO create instance
10:46:15 INFO create instance
10:46:15 INFO create instance
10:46:15 INFO create instance
10:46:15 INFO create instance
10:46:15 INFO create instance
10:46:15 INFO create instance
13:09:22 INFO 3 [OPENWSN] booted
OpenVisualizer
web interface started at  0.0.0.0: 8080
enter 'q' to exit
> 13:09:22 INFO 2 [OPENWSN] booted
13:09:22 INFO 1 [OPENWSN] booted |
That's it, an OpenWSN simulation is now running your computer!
| Info |
|---|
As SCons on Windows can be run with scons.bat, you can launch the simulation on another window with the following command : C:\Users\Tengfei\Desktop\openvisualizer>start cmd.exe /k "scons.bat" runweb --simClosing SCons window will kill the simulation. |
Now, open http://127.0.0.1:8080/ to see the web interface of OpenWSN.
Open the "Topology" tab:
- left click on a mote to move it around
right-click on two motes to connect them with a wireless link
Tip You need to right-click on the red balloon, not the blue rectangle. Confusing, right?
Also, to create a link, you need to right-click on both endpoints.

- left-click on a link to change its PDR (packet delivery ratio)
Set up the topology to have a chain 1-2-3, and set each PDR to 1.
Back in the "Motes" tab, select mote 0001 and click on the "Toggle" button. You just declare mote 1 to be the root of your network (the DAGroot in RPL parlance, the sink in WSN parlance, the gateway, etc).
Congratulations, you have built your first OpenWSN simulated network!
Ping a mote
By convention (i.e. this is hard-coded in the software), the IPv6 prefix of the simulated network is bbbb:/64. This means that the IPv6 address of each mote will start with "bbbb::". The remainder of a mote's IPv6 address is it's MAC address (or EUI-64). You can read this in the web interface (under "EUI-64").
Open a new command prompt to ping mote 2:
| Code Block | ||
|---|---|---|
| ||
C:\Users\Tengfei>ping bbbb::1415:92cc:0:2

Pinging bbbb::1415:92cc:0:2 with 32 bytes of data:
Reply from bbbb::1415:92cc:0:2: time=101ms
Reply from bbbb::1415:92cc:0:2: time=67ms
Reply from bbbb::1415:92cc:0:2: time=97ms
Reply from bbbb::1415:92cc:0:2: time=91ms

Ping statistics for bbbb::1415:92cc:0:2:
    Packets: Sent = 4, Received = 4, Lost = 0 (0% loss),
Approximate round trip times in milli-seconds:
Minimum = 67ms, Maximum = 101ms, Average = 89ms |
You can also ping mote 3 which is 3 hops away:
| Code Block | ||
|---|---|---|
| ||
C:\Users\Tengfei>ping bbbb::1415:92cc:0:3

Pinging bbbb::1415:92cc:0:3 with 32 bytes of data:
Reply from bbbb::1415:92cc:0:3: time=206ms
Reply from bbbb::1415:92cc:0:3: time=95ms
Reply from bbbb::1415:92cc:0:3: time=153ms
Reply from bbbb::1415:92cc:0:3: time=76ms

Ping statistics for bbbb::1415:92cc:0:3:
    Packets: Sent = 4, Received = 4, Lost = 0 (0% loss),
Approximate round trip times in milli-seconds:
Minimum = 76ms, Maximum = 206ms, Average = 132ms |
Interact over CoAP
CoAP is a protocol implement on each OpenWSN device, which makes it appear like a web server on the Internet.
By default, an OpenWSN mote implements a CoAP "info" resource which indicate what version of the code is running. You can test that by running the Python test script provided in the firmware:
| Code Block | ||
|---|---|---|
| ||
C:\Users\Tengfei\Desktop\openwsn-fw\openapps\cinfo
OpenWSN 1.4.1
Python
Python
Python
Done. Press enter to close. |
Debugging with Wireshark
In simulation mode, the openvisualizer takes care of simulating the wireless medium. You can use Wireshark to take a peek at what goes over this simulated radio space.
| Tip | ||
|---|---|---|
| ||
Before you can go on, you need to install Wireshark 6TiSCH dissectors:
|
Start Wireshark (run as administrator) on the OpenWSN interface at address, and configure the filtering for zep (the ZigBee encapsulation protocol).
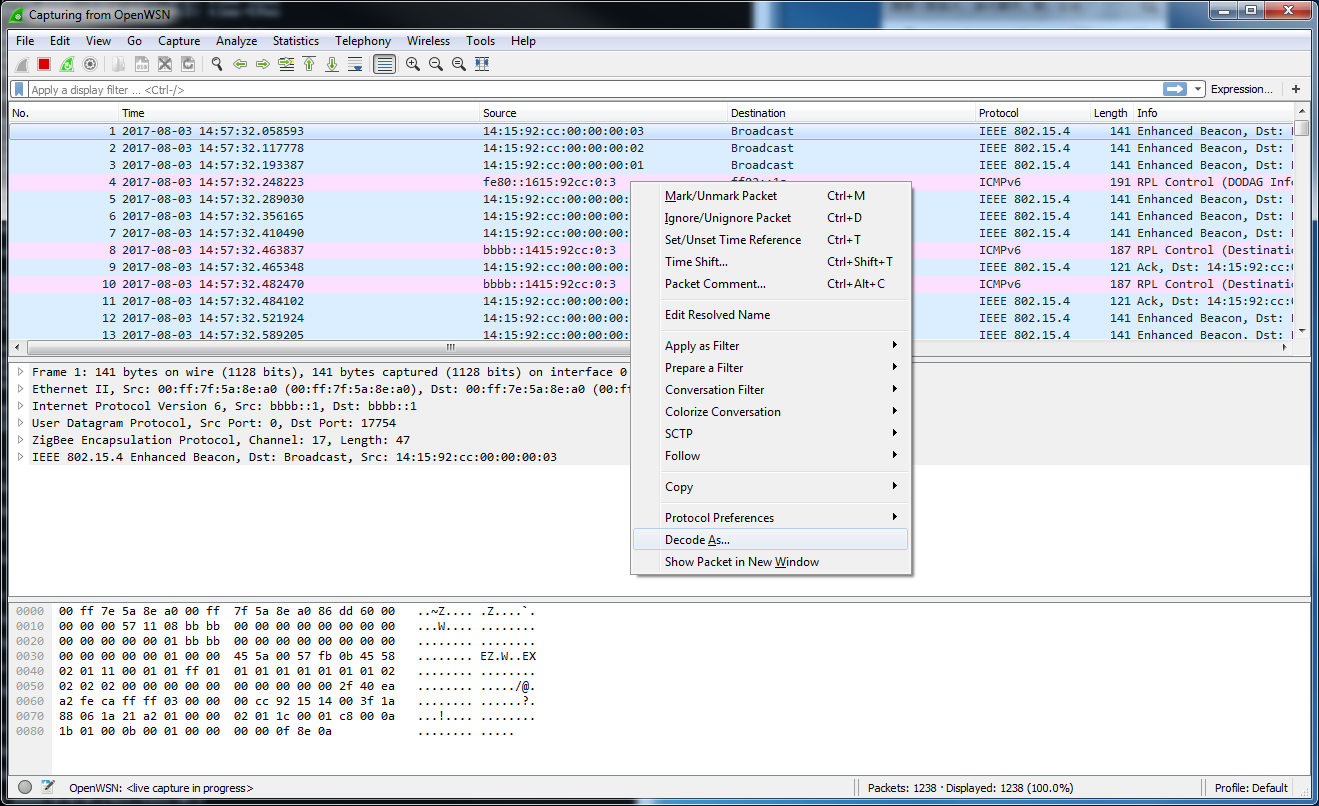
You now see all the packets exchanged over the simulated radio environment, exciting!
You may not able to see the 6LoWPAN packet in your Wireshark, then you need to configure Wireshark to decode it. Choose one packet in your wireshark and right click to choose "Decode As".
In the prompt window, Choose 6LoWPAN protocol on the Current column.
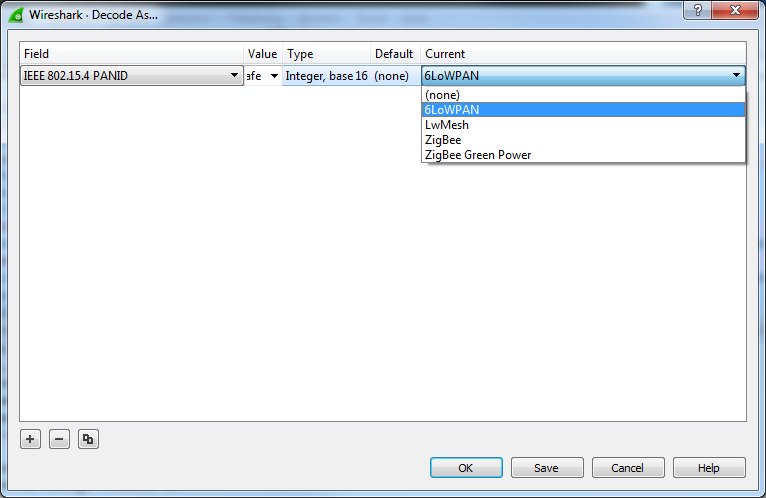
Click "OK" to close the window and do a "Reload" or press "Ctrl+R" to reload current setting. After this operation, you will see the 6LoWPAN packets.
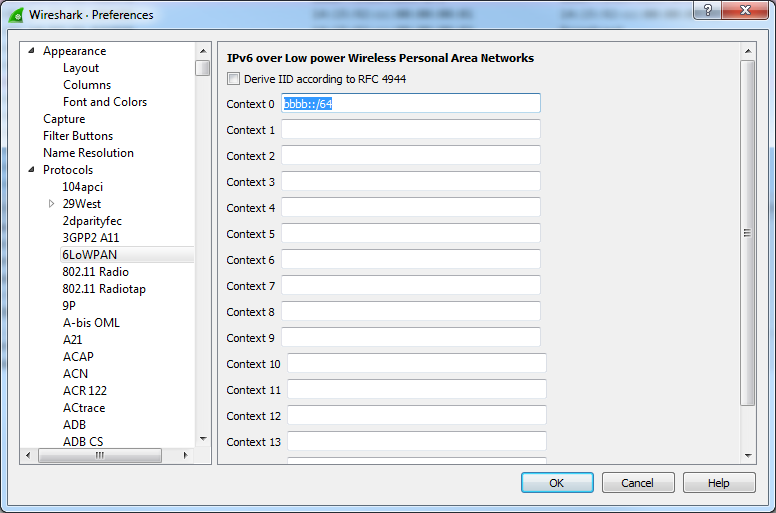
You also need to configure the Wireshark to tell which IPv6 prefix is the network is using. In packet detail content, right click the 6LoWPAN dissect area and choose "Protocol Perference" → "Open 6LoWPAN Perference".
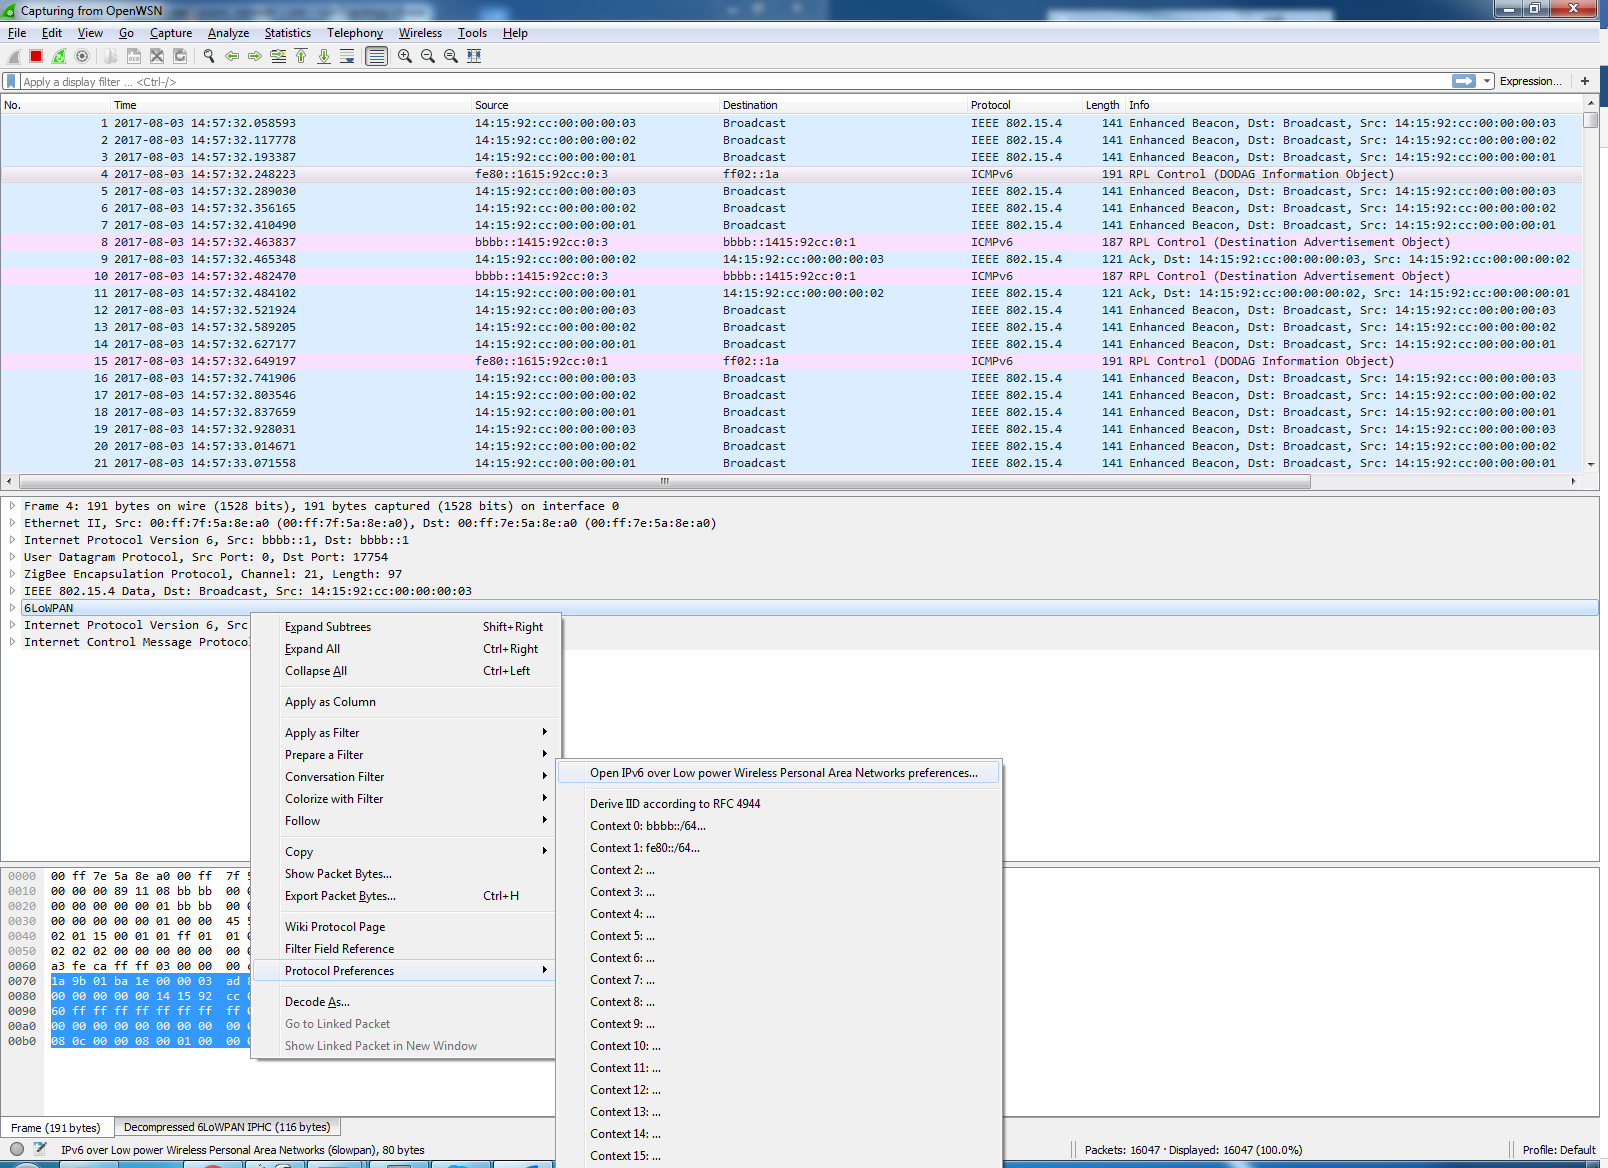
Type bbbb::/64 in the Context 0 textbox to indicate the prefix is using bbbb::, and click OK to close the window. A "Reload" Operation is also required.
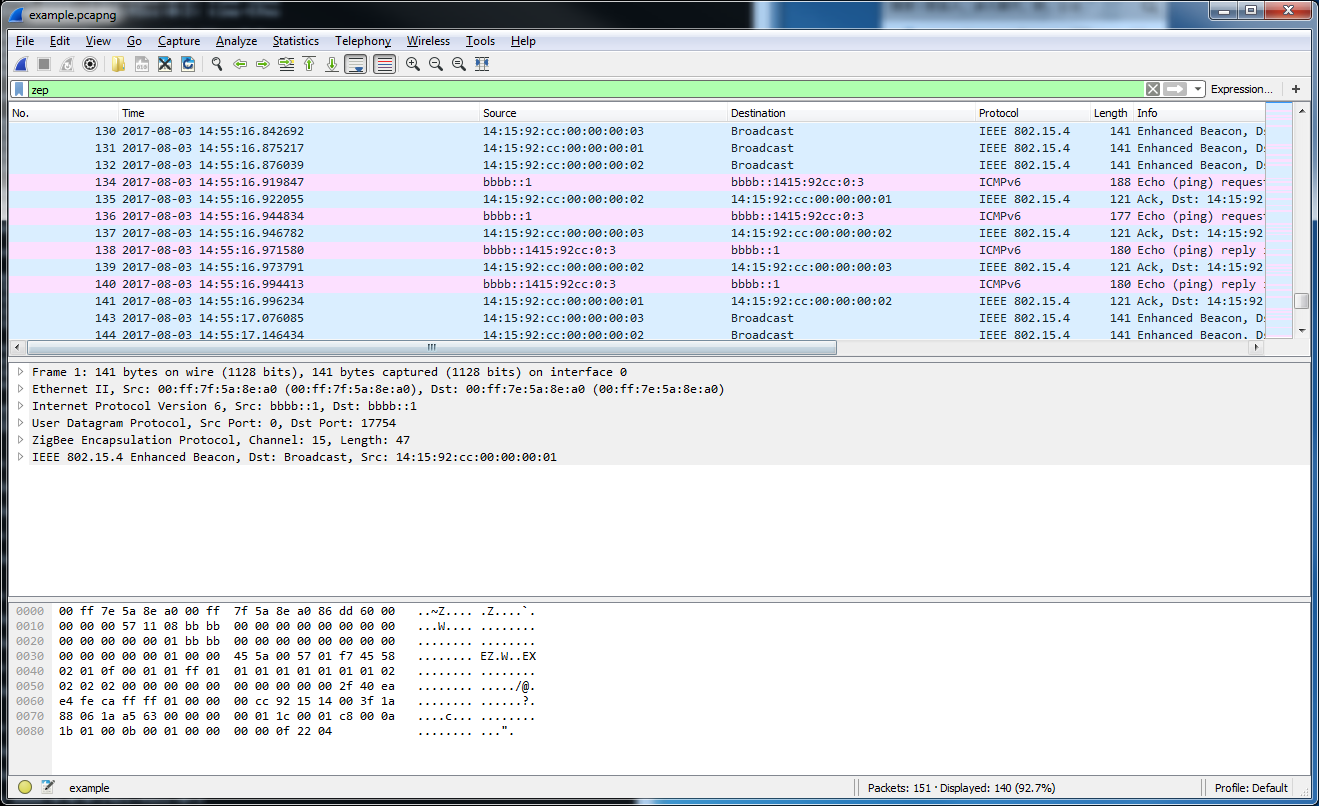
Here is an example pcap file of openwsn simulation network with three motes: example.
Closing the OpenVisualizer
In the command prompt from where you started the OpenVisualizer, type quit to close it
Now with real hardware
User experience with real hardware is identical than when using the simulator. Because it is a popular platform, we will use the TelosB mote, although any other supported hardware platform can be used instead.
Connecting the boards
| Tip | ||
|---|---|---|
| ||
Before you can go on, you need to install the FTDI driver for your TelosB board
|
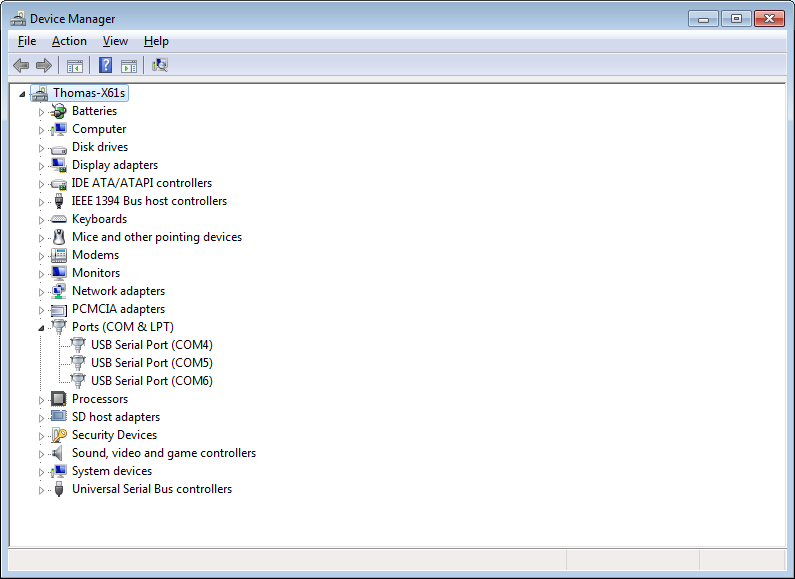
When connecting a TelosB board, Windows assigns it a COM port. You can see which in the Device Manager:
Compiling/Loading firmware
| Tip | ||
|---|---|---|
| ||
Before you can go on, you need to install
|
The build environment allow you to build the firmware and load is on all your boards with a single command (how cool is that?):
| Code Block | ||
|---|---|---|
| ||
C:\Users\Tengfei\Desktop\openwsn-fw>scons board=telosb toolchain=mspgcc bootload=COM4,COM5,COM6 oos_openwsn
scons: Reading SConscript files ...
 ___                 _ _ _  ___  _ _
| . | ___  ___ ._ _ | | | |/ __>| \ |
| | || . \/ ._>| ' || | | |\__ \|   |
`___'|  _/\___.|_|_||__/_/ <___/|_\_|
     |_|                  openwsn.org
scons: done reading SConscript files.
scons: Building targets ...
[...]
Linking   firmware\openos\projects\common\03oos_openwsn_prog.exe
msp430-size firmware\openos\projects\common\03oos_openwsn_prog.exe
   text    data     bss     dec     hex filename
  43156       0    4006   47162    b83a firmware\openos\projects\common\03oos_openwsn_prog.exe
msp430-objcopy --output-target=ihex firmware\openos\projects\common\03oos_openwsn_prog.exe firmware\openos\projects\comm
on\03oos_openwsn_prog.ihex
msp430-objcopy --output-target=binary firmware\openos\projects\common\03oos_openwsn_prog.exe firmware\openos\projects\co
mmon\03oos_openwsn_prog.bin
telosb_bootload(["firmware\openos\projects\common\03oos_openwsn_prog.phonyupload"], ["firmware\openos\projects\common\03
oos_openwsn_prog.ihex"])
starting bootloading on COM4
starting bootloading on COM5
starting bootloading on COM6
[...]
done bootloading on COM4
done bootloading on COM6
done bootloading on COM5
scons: done building targets. |
Start a network
Once the motes are programmed, you have the exact same experience as when running a simulated network.
First, start the OpenVisualizer:
| Code Block | ||
|---|---|---|
| ||
C:\Users\Tengfei\Desktop\openvisualizer>scons runweb
scons: Reading SConscript files ...
 ___                 _ _ _  ___  _ _
| . | ___  ___ ._ _ | | | |/ __>| \ |
| | || . \/ ._>| ' || | | |\__ \|   |
`___'|  _/\___.|_|_||__/_/ <___/|_\_|
     |_|                  openwsn.org
scons: done reading SConscript files.
scons: Building targets ...
Delete("build\runui\web_files")
Mkdir("C:\Users\tengfei\Desktop\openwsn\openwsn-sw\software\openvisualizer\build\runui")
Copy("build\runui\web_files", "bin\openVisualizerApp\web_files")
Delete("build\runui\sim_files")
Mkdir("C:\Users\tengfei\Desktop\openwsn\openwsn-sw\software\openvisualizer\build\runui")
Copy("build\runui\sim_files", "bin\openVisualizerApp\sim_files")
uiRunner(["bin\openVisualizerApp\openVisualizerWeb"], ["bin\openVisualizerApp\openVisualizerWeb.py"]
)
OpenVisualizer
web interface started at  0.0.0.0: 8080
enter 'q' to exit
> |
Open http://127.0.0.1:8080/ to see the web interface:
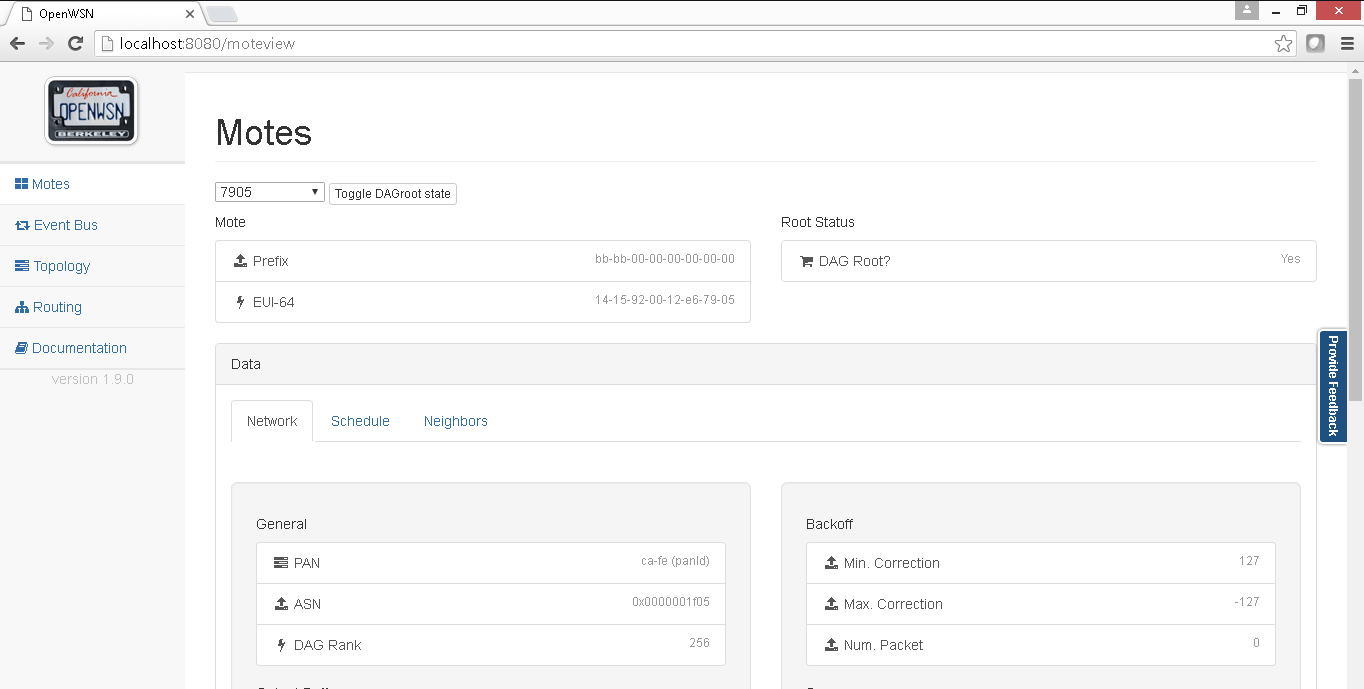
Your TelosB motes turn on their blue LED once synchronized.
| Note | ||||||||||
|---|---|---|---|---|---|---|---|---|---|---|
| ||||||||||
You might be tempted to look for a graphical representation of the topology. Unfortunately, this is only implemented in simulation mode. Really want it? Help fix
|
Ping a mote
You can ping a mote exactly as you would in the simulator:
| Code Block | ||
|---|---|---|
| ||
C:\Users\Tengfei>ping bbbb::1415:9200:12:e63b
Pinging bbbb::1415:9200:12:e63b with 32 bytes of data:
Reply from bbbb::1415:9200:12:e63b: time=285ms
Reply from bbbb::1415:9200:12:e63b: time=276ms
Reply from bbbb::1415:9200:12:e63b: time=437ms
Reply from bbbb::1415:9200:12:e63b: time=431ms
Ping statistics for bbbb::1415:9200:12:e63b:
    Packets: Sent = 4, Received = 4, Lost = 0 (0% loss),
Approximate round trip times in milli-seconds:
Minimum = 276ms, Maximum = 437ms, Average = 357ms |
Interaction over CoAP
You can interact with a mote exactly as you would in the simulator. After modifying the rinfo.py script to communicate with mote bbbb::1415:9200:12:e63b:
| Code Block | ||
|---|---|---|
| ||
C:\Users\Tengfei\Desktop\openwsn-fw\openapps\cinfo>python cinfo.py
C:\Users\Tengfei\Desktop\openwsn-fw\openapps\cinfo
OpenWSN 1.4.1
TelosB
MSP430f1611
CC2420
Done. Press enter to close. |
What's next?
Congratulations! You've now gone through the trouble of installing all of the tools and pieces of OpenWSN. From now on, it's just fun.
- join the Mailing List.
- asks questions through the questions plugin.
- submit bugs and feature requests through the issue tracker.