Kickstart Linux
If you are completely new to OpenWSN, and you are using Linux, read this page first. It will walk you through all the steps to install OpenWSN and explore a number of key features.
In particular you will:
- compile and run OpenWSN in simulation mode, ping a simulated mote, and interact with it over CoAP.
- program a OpenMote-CC2538 mote, connect it to your computer, ping it, and interact with it over CoAP.
What to bring?
- a computer running Linux with root access. This page is written with Ubuntu 18.10 Cosmic.
- optionally, two TelosB motes to play with real hardware.
At the time of writing, we are using the latest and greatest of all software. Undoubtedly, this will become outdated very fast. If you see something out of the date, take action! Send an e-mail to Tengfei Chang or Thomas Watteyne to get this page update. Thanks!
Quick Start
You can install everything mentioned in this page with one single script: install.sh. To run it, you need type in follow command in terminal under ~/Desktop folder.
~/Desktop$ chmod +x ./install.sh
~/Desktop$ ./install.sh
In case excepted thing happens, you can still follow the steps detailed in this page.
Download OpenWSN
OpenWSN is a collection of repositories hosted on GitHub. We will download and use the following:
- https://github.com/openwsn-berkeley/openwsn-fw holds the firmware source code which runs on the (possibly emulated) motes
- https://github.com/openwsn-berkeley/openvisualizer holds the software source code which runs on your computer
- https://github.com/openwsn-berkeley/coap is a Python module which implements CoAP
We will download these repositories side-by-side in an openwsn/ directory in your desktop using Git.
~$ cd Desktop/
~/Desktop$ mkdir openwsn
~/Desktop$ cd openwsn/
~/Desktop/openwsn$ git clone https://github.com/openwsn-berkeley/openwsn-fw.git
[...]
~/Desktop/openwsn$ git clone https://github.com/openwsn-berkeley/openvisualizer.git
[...]
~/Desktop/openwsn$ git clone https://github.com/openwsn-berkeley/coap.git
[...]
At any time, you can make sure that you are using the latest code by using git pull:
~$ cd Desktop/
~/Desktop$ cd openwsn/
~/Desktop/openwsn$ cd openvisualizer/
~/Desktop/openwsn/openvisualizer$ git pull
Already up-to-date.
~/Desktop/openwsn/openvisualizer$ cd ..
~/Desktop/openwsn$ cd openwsn-fw/
~/Desktop/openwsn/openwsn-fw$ git pull
Already up-to-date.
Running a Simulation
Frankly, it's a bit strange to start using OpenWSN with a simulation, since the firmware is really meant (and written) to run on real motes. But, not everyone has hardware, not always the same hardware, etc. So to make things nice and easy, we'll start by simulation. Oh, and the simulated code behaves exactly the same as the real code, so what you see now is what you'll get with real hardware.
Prepare
Before we can start running a simulation, we need to compile the firmware as a Python extension. This is all explained in the OpenSim page if you want to know what's going on.
Oops!
Before you can go on, you need to install the Python header files:
~/Desktop/openwsn/openwsn-fw$ sudo apt-get install python-dev
Oops!
Before you can go on, you need to install SCons:
~/Desktop/openwsn$ sudo apt-get install scons
~/Desktop/openwsn$ cd openwsn-fw/
~/Desktop/openwsn/openwsn-fw$ scons board=python toolchain=gcc oos_openwsn
[...]
Archiving build/python_gcc/bsp/boards/python/libbsp.a
Indexing  build/python_gcc/bsp/boards/python/libbsp.a
Linking (shared)   build/python_gcc/projects/common/oos_openwsn.so
scons: done building targets.
This step compile the complete OpenWSN firmware as a Python extension module (a form of shared library) which the simulation environment can import at run-time.
The extension module is at ~/Desktop/openwsn/openwsn-fw/projects/common/oos_openwsn.so, no need to move it.
Simulate
You can now start a simulation. Running a simulation just means taking the usual software which runs on your computer (and call "openvisualizer"), but running it in simulation mode. That is, instead of the openvisualizer connecting to read motes, it connects to emulated mote code actually running on you machine.
Oops!
Before you can go on, you need to install some Python packages:
~/Desktop/openwsn/openvisualizer/$ sudo pip install -r requirements.txt
~/Desktop/openwsn/coap/$ sudo pip install -r requirements.txt
The current version of pip 8.1.2 has some changes on the source code, which may cause the error: AttributeError: 'Requirement' object has no attribute 'project_name' when use the -r option to install the packages, . If this error happens, try to install those packages one by one as shown previously.
PySerial is also required and it's available in Debian/Ubuntu. you need to install the PySerial if it's not installed on your machine.
~/Desktop/openwsn/openvisualizer$ sudo pip install PySerial
Start a simulation:
~/Desktop/openwsn/openvisualizer$ sudo scons runweb --sim
scons: Reading SConscript files ...

 ___                 _ _ _  ___  _ _
| . | ___  ___ ._ _ | | | |/ __>| \ |
| | || . \/ ._>| ' || | | |\__ \|   |
`___'|  _/\___.|_|_||__/_/ <___/|_\_|
     |_|                  openwsn.org

scons: done reading SConscript files.
scons: Building targets ...
Copy("bin/sim_files", "../openwsn-fw/bsp/boards/python/openwsnmodule_obj.h")
Mkdir("bin/sim_files/linux")
Copy("bin/sim_files/linux/oos_openwsn-x86.so", "../openwsn-fw/build/python_gcc/projects/common/oos_openwsn.so")
Copy("bin/sim_files", "../openwsn-fw/build/python_gcc/projects/common/oos_openwsn.pyd")
Delete("build/runui/web_files")
Mkdir("/home/thomas/Desktop/openwsn/openvisualizer/build/runui")
Copy("build/runui/web_files", "bin/web_files")
Delete("build/runui/sim_files")
Mkdir("/home/thomas/Desktop/openwsn/openvisualizer/build/runui")
Copy("build/runui/sim_files", "bin/sim_files")
uiRunner(["bin/openVisualizerWeb"], ["bin/openVisualizerWeb.py"])
ioctl(TUNSETIFF): Device or resource busy

created following virtual interface:
6: tun0: <POINTOPOINT,MULTICAST,NOARP,UP,LOWER_UP> mtu 1500 qdisc pfifo_fast state UNKNOWN qlen 500
    link/none
    inet6 bbbb::1/64 scope global
       valid_lft forever preferred_lft forever
    inet6 fe80::1/64 scope link
       valid_lft forever preferred_lft forever
21:57:51 INFO create instance
21:57:51 INFO create instance
21:57:51 INFO create instance
21:57:51 INFO create instance
21:57:51 INFO create instance
21:57:51 INFO create instance
21:57:51 INFO create instance
21:57:51 INFO create instance
21:57:51 INFO create instance
OpenVisualizer
web interface started at  0.0.0.0: 8080
enter 'quit' to exit
> 21:57:51 INFO 3 [OPENWSN] booted
21:57:51 INFO 2 [OPENWSN] booted
21:57:51 INFO 1 [OPENWSN] booted
You need to run the openvisualizer with "sudo" since the Python program will create a tun interface.
That's it, an OpenWSN simulation is now running your computer!
Open http://127.0.0.1:8080/ to see the web interface of OpenWSN

Open the "Topology" tab:
- left click on a mote to move it around
right-click on two motes to connect them with a wireless link
You need to right-click on the red balloon, not the blue rectangle. Confusing, right?
Also, to create a link, you need to right-click on both endpoints.

- left-click on a link to change its PDR (packet delivery ratio)
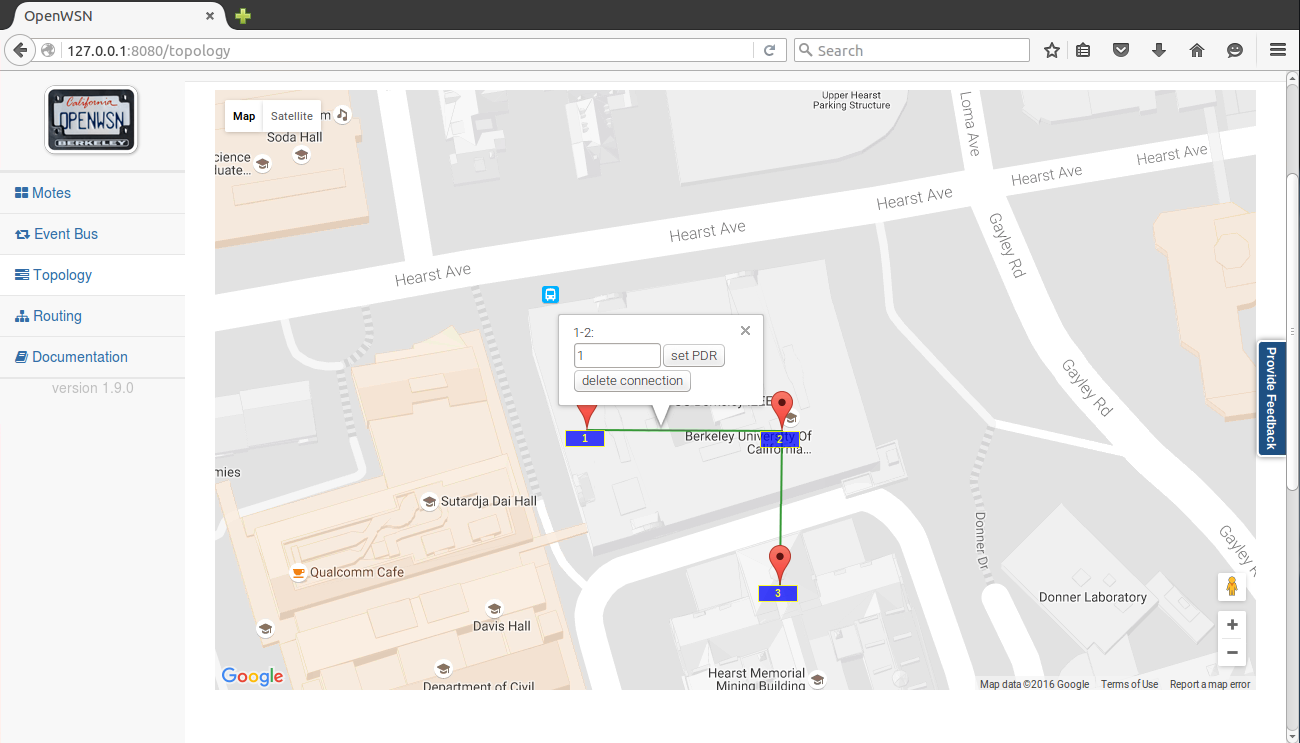
Set up the topology to have a chain 1-2-3, and set each PDR to 1.
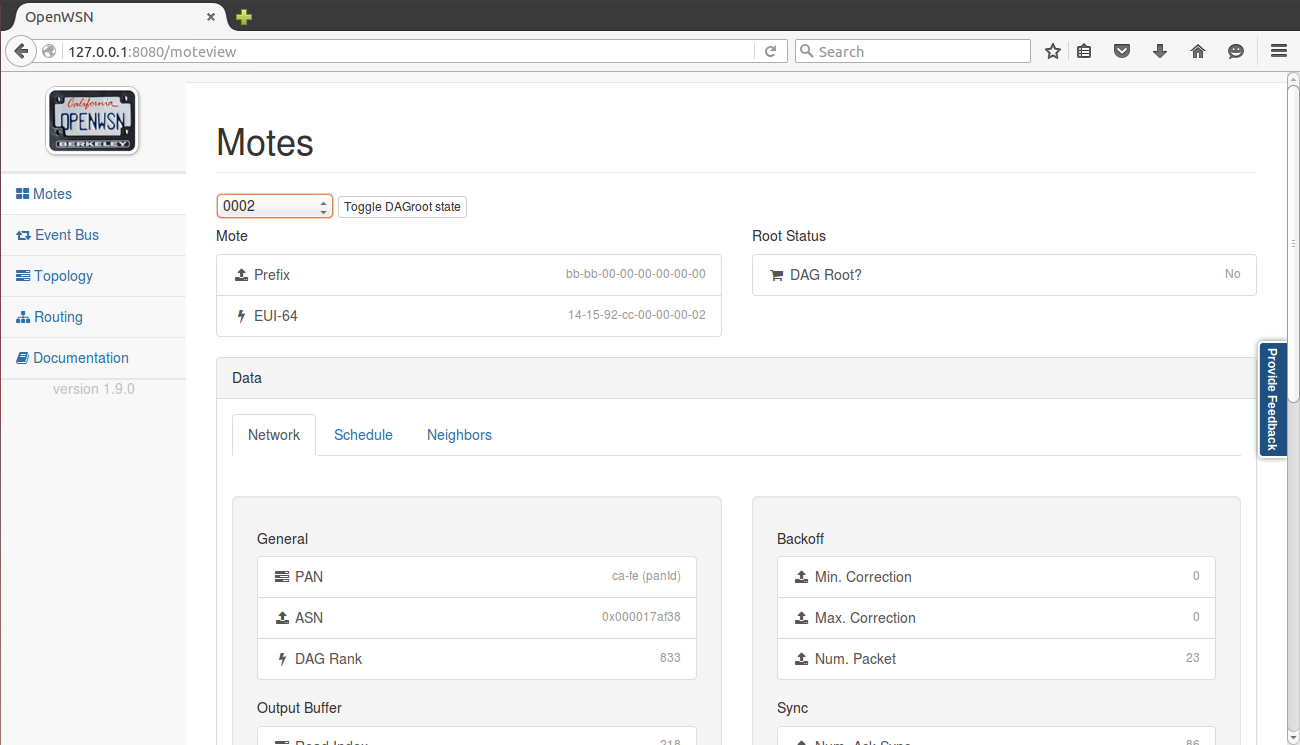
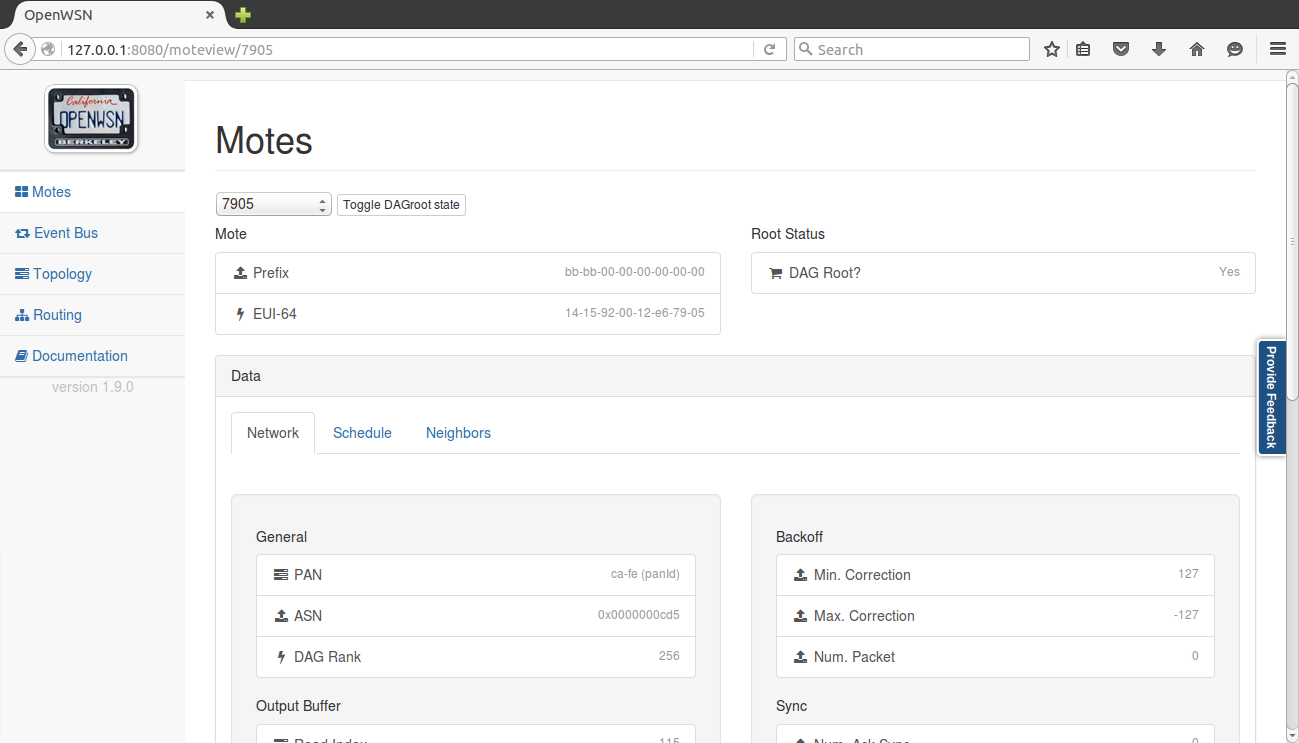
Back in the "Motes" tab, select mote 0001 and click on the "Toggle" button. You just declare mote 1 to be the root of your network (the DAGroot in RPL parlance, the sink in WSN parlance, the gateway, etc). You can select other motes and see that they join the network and obtained the same prefix bbbb::/64.
Congratulations, you have built your first OpenWSN simulated network!
Ping a mote
By convention (i.e. this is hard-coded in the software), the IPv6 prefix of the simulated network is bbbb:/64. This means that the IPv6 address of each mote will start with "bbbb::". The remainder of a mote's IPv6 address is it's MAC address (or EUI-64). You can read this in the web interface (under "EUI-64").
 Open a new terminal to ping mote 2:
~/Desktop/openwsn/openvisualizer$ ping6 -s 10 bbbb::1415:92cc:0:2
PING bbbb::1415:92cc:0:2(bbbb::1415:92cc:0:2) 56 data bytes
64 bytes from bbbb::1415:92cc:0:2: icmp_seq=1 ttl=64 time=51.1 ms
64 bytes from bbbb::1415:92cc:0:2: icmp_seq=2 ttl=64 time=134 ms
64 bytes from bbbb::1415:92cc:0:2: icmp_seq=3 ttl=64 time=137 ms
64 bytes from bbbb::1415:92cc:0:2: icmp_seq=4 ttl=64 time=101 ms
^C
--- bbbb::1415:92cc:0:2 ping statistics ---
4 packets transmitted, 4 received, 0% packet loss, time 3004ms
rtt min/avg/max/mdev = 51.172/106.146/137.486/34.713 ms
You can also ping mote 3 which is 3 hops away:
~/Desktop/openwsn/openvisualizer$ ping6 -s 10 bbbb::1415:92cc:0:3
PING bbbb::1415:92cc:0:3(bbbb::1415:92cc:0:3) 10 data bytes
18 bytes from bbbb::1415:92cc:0:3: icmp_seq=1 ttl=63 time=80.1 ms
18 bytes from bbbb::1415:92cc:0:3: icmp_seq=2 ttl=63 time=105 ms
18 bytes from bbbb::1415:92cc:0:3: icmp_seq=3 ttl=63 time=94.0 ms
18 bytes from bbbb::1415:92cc:0:3: icmp_seq=4 ttl=63 time=147 ms
^C
--- bbbb::1415:92cc:0:3 ping statistics ---
4 packets transmitted, 4 received, 0% packet loss, time 3001ms
rtt min/avg/max/mdev = 80.115/106.887/147.964/25.359 ms
We had to reduce size of the ping request for that one (-s 10). The reason is that the packet contains also a source routing header, leaving less bytes for payload.
Interact over CoAP
CoAP is a protocol implement on each OpenWSN device, which makes it appear like a web server on the Internet.
By default, an OpenWSN mote implements a CoAP "info" resource which indicate what version of the code is running. You can test that by running the Python test script provided in the firmware:
~/Desktop/openwsn/openwsn-fw/openapps/cinfo$ python cinfo.py
/home/thomas/Desktop/openwsn/openwsn-fw/openapps/cinfo
OpenWSN 1.9.0
Python
Python
Python
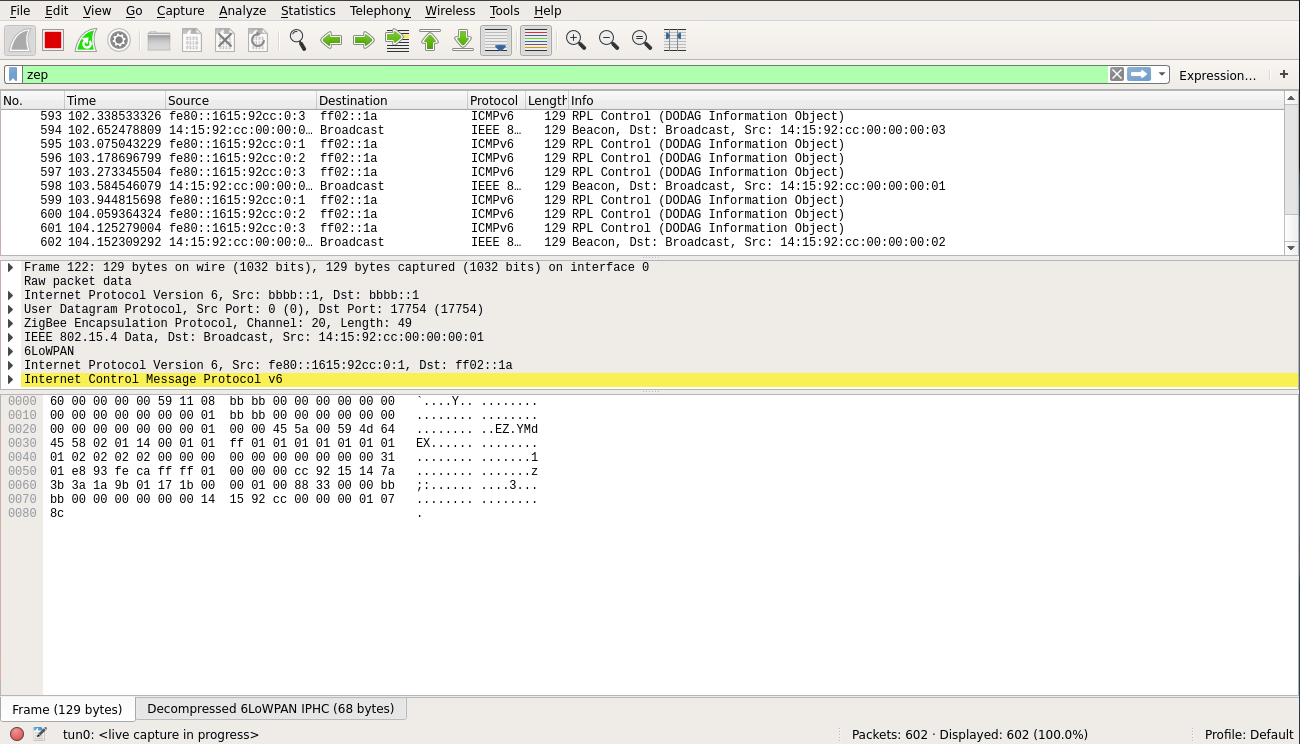
Debugging with Wireshark
In simulation mode, the openvisualizer takes care of simulating the wireless medium. You can use Wireshark to take a peek at what goes over this simulated radio space.
You can download the Wireshark from https://www.wireshark.org/download/automated/ and install with default configuration.
Start Wireshark on the tun interface at address bbbb::1, and configure the filtering for zep (the ZigBee encapsulation protocol).
You need to start Wireshark with "sudo":
sudo wireshark
You now see all the packets exchanged over the simulated radio environment, exciting!
Here is an example pcap file of openwsn simulation network with three motes: example.
Closing the OpenVisualizer
In the terminal from where you started the OpenVisualizer, type q to close it
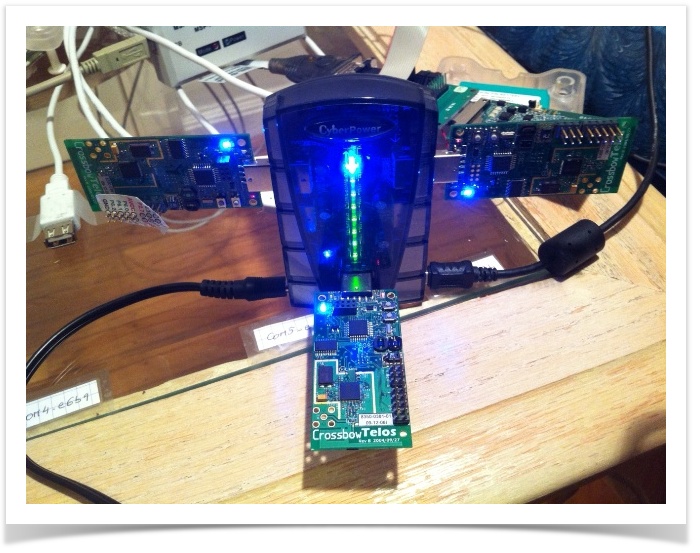
Now with real hardware
User experience with real hardware is identical than when using the simulator. Because it is a popular platform, we will use the TelosB mote, although any other supported hardware platform can be used instead.
Connecting the boards
When connecting a TelosB board, you Linux will assign it a device file. Reading/writing to/from that file results in bytes being sent to/from your TelosB over its UART interface. To know which device your TelosB is located at, plug it into your computer, wait a second, and type dmesg:
[ 1181.904524] usb 1-3.3.2: new full-speed USB device number 5 using ehci_hcd
[ 1182.002641] usb 1-3.3.2: New USB device found, idVendor=0403, idProduct=6001
[ 1182.002651] usb 1-3.3.2: New USB device strings: Mfr=1, Product=2, SerialNumber=3
[ 1182.002659] usb 1-3.3.2: Product: Crossbow Telos Rev.B
[ 1182.002667] usb 1-3.3.2: Manufacturer: XBOW
[ 1182.002674] usb 1-3.3.2: SerialNumber: XBRAHL2O
[ 1182.035737] usbcore: registered new interface driver usbserial
[ 1182.035784] usbcore: registered new interface driver usbserial_generic
[ 1182.035819] USB Serial support registered for generic
[ 1182.035835] usbserial: USB Serial Driver core
[ 1182.041321] usbcore: registered new interface driver ftdi_sio
[ 1182.041363] USB Serial support registered for FTDI USB Serial Device
[ 1182.041627] ftdi_sio 1-3.3.2:1.0: FTDI USB Serial Device converter detected
[ 1182.041785] usb 1-3.3.2: Detected FT232BM
[ 1182.041793] usb 1-3.3.2: Number of endpoints 2
[ 1182.041801] usb 1-3.3.2: Endpoint 1 MaxPacketSize 64
[ 1182.041809] usb 1-3.3.2: Endpoint 2 MaxPacketSize 64
[ 1182.041815] usb 1-3.3.2: Setting MaxPacketSize 64
[ 1182.043704] usb 1-3.3.2: FTDI USB Serial Device converter now attached to ttyUSB0
[ 1182.043742] ftdi_sio: v1.6.0:USB FTDI Serial Converters Driver
The penultimate line indicates that this TelosB is attached to /dev/ttyUSB0. You can repeat the same procedure for the other boards. In my case, I have 3 motes connected:
thomas@Thomas-X61s:~/Desktop/openwsn/openwsn-fw$ ls /dev/ttyU*
/dev/ttyUSB0  /dev/ttyUSB1  /dev/ttyUSB2
Compiling/Loading firmware
Wait!
Before going on, you need to make sure you have a recent version mspgcc:
thomas@Thomas-X61s:~$ msp430-gcc --version
msp430-gcc (GCC) 4.6.3 20120301 (mspgcc LTS 20120406 unpatched)
Copyright (C) 2011 Free Software Foundation, Inc.
This is free software; see the source for copying conditions.  There is NO
warranty; not even for MERCHANTABILITY or FITNESS FOR A PARTICULAR PURPOSE.
In particular, earlier versions Ubuntu (e.g. 12.04 LTS) came with the older msp430-gcc 4.5.3. This will NOT work; see FW-209 - Getting issue details... STATUS for details.
OpenMote
If you compile for the OpenMote board, you need to use the package "gcc-arm-none-eabi" and use the toolchain "armgcc"
The build environment allow you to build the firmware and load is on all your boards with a single command (how cool is that?):
thomas@Thomas-X61s:~/Desktop/openwsn/openwsn-fw$ sudo scons board=telosb toolchain=mspgcc bootload=/dev/ttyUSB2 oos_openwsn
scons: Reading SConscript files ...
 ___                 _ _ _  ___  _ _
| . | ___  ___ ._ _ | | | |/ __>| \ |
| | || . \/ ._>| ' || | | |\__ \|   |
`___'|  _/\___.|_|_||__/_/ <___/|_\_|
     |_|                  openwsn.org
scons: done reading SConscript files.
scons: Building targets ...
msp430-size firmware/openos/projects/common/03oos_openwsn_prog
   text	   data	    bss	    dec	    hex	filename
  41024	      0	   4138	  45162	   b06a	firmware/openos/projects/common/03oos_openwsn_prog
telosb_bootload(["firmware/openos/projects/common/03oos_openwsn_prog.phonyupload"], ["firmware/openos/projects/common/03oos_openwsn_prog.ihex"])
starting bootloading on /dev/ttyUSB2
MSP430 Bootstrap Loader Version: 1.39-telos-8
Mass Erase...
Transmit default password ...
Invoking BSL...
Transmit default password ...
Current bootstrap loader version: 1.61 (Device ID: f16c)
Changing baudrate to 38400 ...
Program ...
41024 bytes programmed.
Reset device ...
done bootloading on /dev/ttyUSB2
scons: done building targets.
Programming multiple motes?
While the command allows you to program multiple motes in one go:
sudo scons board=telosb toolchain=mspgcc bootload=/dev/ttyUSB0,/dev/ttyUSB1,/dev/ttyUSB2 oos_openwsn
Linux seems to have synchronization errors when doing so. See SW-136 - Getting issue details... STATUS .
Start a network
Once the motes are programmed, you have the exact same experience as when running a simulated network.
First, start the OpenVisualizer:
thomas@Thomas-X61s:~/Desktop/openwsn/openvisualizer$ sudo scons runweb
scons: Reading SConscript files ...
 ___                 _ _ _  ___  _ _
| . | ___  ___ ._ _ | | | |/ __>| \ |
| | || . \/ ._>| ' || | | |\__ \|   |
`___'|  _/\___.|_|_||__/_/ <___/|_\_|
     |_|                  openwsn.org
scons: done reading SConscript files.
scons: Building targets ...
Delete("build/runui/web_files")
Mkdir("/home/thomas/Desktop/openwsn/openvisualizer/build/runui")
Copy("build/runui/web_files", "bin/web_files")
Delete("build/runui/sim_files")
Mkdir("/home/thomas/Desktop/openwsn/openvisualizer/build/runui")
Copy("build/runui/sim_files", "bin/sim_files")
uiRunner(["bin/openVisualizerWeb"], ["bin/openVisualizerWeb.py"])
Child PID is 2820
scons: done building targets.
thomas@Thomas-X61s:~/Desktop/openwsn/openvisualizer$ ioctl(TUNSETIFF): Device or resource busy
created following virtual interface:
4: tun0: <POINTOPOINT,MULTICAST,NOARP,UP,LOWER_UP> mtu 1500 qdisc pfifo_fast state UNKNOWN qlen 500
    link/none
    inet6 bbbb::1/64 scope global
       valid_lft forever preferred_lft forever
    inet6 fe80::1/64 scope link
       valid_lft forever preferred_lft forever
Open http://127.0.0.1:8080/ to see the web interface:
Your TelosB motes turn on their blue LED once synchronized.
Can I see the topology?
You might be tempted to look for a graphical representation of the topology. Unfortunately, this is only implemented in simulation mode. Really want it? Help fix SW-137 - Getting issue details... STATUS .
Ping a mote
You can ping a mote exactly as you would in the simulator:
thomas@Thomas-X61s:~$ ping6 bbbb::1415:9200:12:e63b
PING bbbb::1415:9200:12:e63b(bbbb::1415:9200:12:e63b) 56 data bytes
64 bytes from bbbb::1415:9200:12:e63b: icmp_seq=1 ttl=64 time=365 ms
64 bytes from bbbb::1415:9200:12:e63b: icmp_seq=2 ttl=64 time=354 ms
64 bytes from bbbb::1415:9200:12:e63b: icmp_seq=3 ttl=64 time=344 ms
64 bytes from bbbb::1415:9200:12:e63b: icmp_seq=4 ttl=64 time=340 ms
64 bytes from bbbb::1415:9200:12:e63b: icmp_seq=5 ttl=64 time=332 ms
^C
--- bbbb::1415:9200:12:e63b ping statistics ---
5 packets transmitted, 5 received, 0% packet loss, time 4006ms
rtt min/avg/max/mdev = 332.908/347.599/365.737/11.417 ms
Interaction over CoAP
You can interact with a mote exactly as you would in the simulator. After modifying the cinfo.py script to communicate with mote bbbb::1415:9200:12:e63b:
thomas@Thomas-X61s:~/Desktop/openwsn/openwsn-fw/openapps/cinfo$ python cinfo.py
/home/thomas/Desktop/openwsn/openwsn-fw/openapps/cinfo
OpenWSN 1.9
TelosB
MSP430f1611
CC2420
Done. Press enter to close.
What's next?
Congratulations! You've now gone through the trouble of installing all of the tools and pieces of OpenWSN. From now on, it's just fun.
- join the Mailing List.
- asks questions through the questions plugin.
- submit bugs and feature requests through the issue tracker.
AttributeError: 'Requirement' object has no attribute 'project_name'