Adding a CoAP app
This page is under construction!
If you are looking for a quick start on attaching your own sensor to the OpenWSN stack, and sending the information wirelessly to your computer (or any computer on the Internet), then this tutorial will show you the basic steps of designing your own OpenWSN application. This tutorial assumes that you have the OpenWSN stack running on your hardware. If not, please see the other wiki pages for help on installing the basic OpenWSN tools.
Introduction
OpenWSN is a powerful WSN stack, featuring advanced low-level synchronization and communication algorithms, as well as higher-level IPv6 functionality, which permit you to send your data straight to the internet. The availability of all of these features can make it overwhelming for new users to start developing applications. Most simple WSN applications do not require you to fully understand all the low-level features. Sometimes, users just want to transmit data from sensors or ping motes in the field. This tutorial will show you how easy it is to design such a simple application.
In this tutorial we will design a simple OpenWSN example application called “cexample.” The application runs on top of OpenWSN and samples the Analog to Digital Converter (ADC) on your microcontroller. The ADC can be connected to a sensor of your choice. In this case we will be collecting temperature readings every 5 seconds and transmitting them to a central server. If you want to connect your own analog sensor, you can copy this example verbatim. If you want to use a digital sensor (I2C, SPI, etc.) you should be able to modify this application easily with some basic programming knowledge. We will begin by giving you a basic introduction to how this example application fits within the OpenWSN stack, after which we will go into specific steps necessary to port it to your project.
Basic Architecture
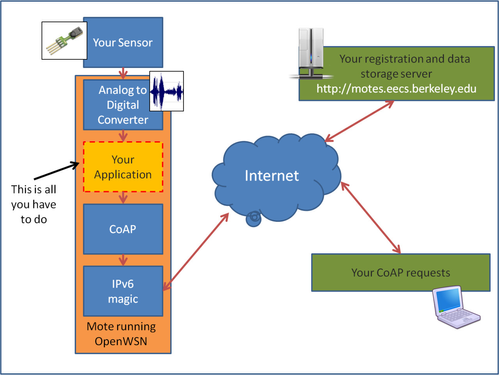
The figure below shows the basic components that comprise our simple example application. In this figure, a mote is running the OpenWSN stack, and is part of a larger OpenWSN network. A sensor is connected to our mote’s microcontroller. Simply speaking, our application runs on top of the CoAP protocol, located in a layer below. CoAP stands for Constrained Applications Protocol. If you’re familiar with HTTP, then CoAP is like a simpler version of HTTP, which permits us to talk to our application over the internet. This abstracts any need to interface through the lower OpenWSN layers, and will permit us to ping the application through other computers on the internet (even web browsers). In our case, the CoAP layer in OpenWSN stack will control how often our application is executed. Don’t worry however, you will not need to edit anything in the CoAP layer. We will only need to make sure that our application interfaces correctly to CoAP, and OpenWSN will take care of everything else. Our application will register with the CoAP components, and request a timer. This timer determines how often we want our application to do something, basically scheduling it. OpenWSN manages this timer, thus executing some task within our application. The application will then tell the microcontroller’s ADC to sample the sensor once every while (in our case every 5 seconds). The reading is stored in a 2Byte (16bit) variable. This value is then placed into an OpenWSN IPv6 packet.
Your job stops here, but if you are interested in what happens next, we can follow the packet through the CoAP component, into the IPv6 layer. If you set up OpenWSN correctly, the packet will eventually end up on a server dedicated to recording the sensor readings. This server will permit you to store and retrieve your sensor readings. It will also provide you with the IPv6 address of your mote, which you can use to ping the mote, and send it further commands from a computer connected to the internet. If you don’t have your own server running, you will be able to use our server to store and retrieve your sensor readings. We also have visualization applications that will plot your readings in real time on our website.
The following section will give you specific details on how to develop your own application. All of this example code is also available in the OpenWSN repository, under the application called “rex.” We will now cover:
- How to create a simple OpenWSN application.
- How to interface your application to CoAP.
- How to create a simple timer.
- How to sample the ADC in our application every time the timer fires.
- How to send a CoAP IPv6 packet with our sensor data to a CoAP server.
- How to access/plot your sensor data in real-time, and how to ping your mote in the field.
Creating an OpenWSN application
Create the necessary application files
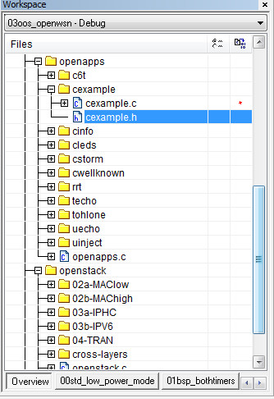
For our application, we need to create the cexample.c and .h files, and place them into the openapps directory (see figure). In this example our application is composed of the cexample.c and cexample.h files. These files will hold our basic application code.
Register your application with the OpenWSN stack
Goto your opendefs.h file and add a UNIQUE identifier to the "//component identifiers" enum structure (see below).
//component identifiers
enum {
   COMPONENT_NULL                      = 0x00,
   //cross-layers
   COMPONENT_IDMANAGER                 = 0x01,
   COMPONENT_OPENQUEUE                 = 0x02,
  .
  .
  .
   // applications
   COMPONENT_C6T                       = 0x1a,
   COMPONENT_CEXAMPLE                  = 0x1b, //--YOUR APP IDENTIFIER--//
   .
   .
   COMPONENT_UECHO                     = 0x23,
   COMPONENT_UINJECT                   = 0x24,
   COMPONENT_RRT                       = 0x25,
   COMPONENT_SECURITY                  = 0x26,
};
We also need to go to openapps.c, and add cexample_init() into our main initialization function (cexample_init()is described below):
openwsn.c
.
.
.
#include "cleds.h"
#include "cexample.h" // add header file
#include "cstorm.h"
.
.
.
void openapps_init() {
   // CoAP
   c6t_init();
   cinfo_init();
   cexample_init(); // add initial function
   cleds__init();
   cstorm_init();
   cwellknown_init();
   rrt_init();
  .
  .
  .
}
Basic application Structure
The core of our app lives in cexample.c, while cexample.h only holds prototyping information. Taking a closer look at cexample.c, we notice some basic include statements. No matter what your app does, you will likely need most of these:
#include "opendefs.h"
#include "cexample.h"
#include "opencoap.h"
#include "opentimers.h"
#include "openqueue.h"
#include "packetfunctions.h"
#include "openserial.h"
#include "openrandom.h"
#include "scheduler.h"
#include "ADC_Channel.h"

#include "IEEE802154E.h"
Basic application Structure
The application defines some basic properties: How long is our timer period? How large will our packets be? What is the short name of our application when others access it via CoAP?
/// inter-packet period (in ms)
#define CEXAMPLEPERIOD  10000
#define PAYLOADLEN      40
const uint8_t cexample_path0[] = "ex";
We now need to create an cexample_init() function, which will be called when OpenWSN first starts. This function will initialize the variables that describe the "cexample" app to CoAP. Furthermore, we point to two callback functions: One is called when receives a packet from CoAP, and one is called when cexample is done sending a packet to CoAP. We will not use these functions in this example, but they may be useful to you in the future. Consider them like higher-level interrupts that alert your application of network traffic over IPv6. We then register the app with CoAP, and start a timer (describe below).
void cexample_init() {
   // prepare the resource descriptor for the /ex path
   cexample_vars.desc.path0len             = sizeof(cexample_path0)-1;
   cexample_vars.desc.path0val             = (uint8_t*)(&cexample_path0);
   cexample_vars.desc.path1len             = 0;
   cexample_vars.desc.path1val             = NULL;
   cexample_vars.desc.componentID          = COMPONENT_CEXAMPLE;
   cexample_vars.desc.discoverable         = TRUE;
   cexample_vars.desc.callbackRx           = &cexample_receive;
   cexample_vars.desc.callbackSendDone     = &cexample_sendDone;


   opencoap_register(&cexample_vars.desc);
   cexample_vars.timerId    = opentimers_start(CEXAMPLEPERIOD,
                                                TIMER_PERIODIC,TIME_MS,
                                                cexample_timer_cb);

}
Starting a periodic timer
In the above lines, our app starts an openTimer, which is a higher-level timer module you can use to execute single or periodic tasks within OpenWSN. The code above tells openTimers to call the function
cexample_timer_cb(), once every
CEXAMPLEPERIOD milliseconds. We set the timer type to TIMER_PERIODIC, to tell the timer module to execute cexample_timer_cb() periodically, rather than just one time.
Executing a function once the timer expires
Once every 5 seconds we will want to run the ADC, collect a readings, and send it out. When the timer fires it will call cexample_timer_cb():
//timer fired, but we don't want to execute task in ISR mode
//instead, push task to scheduler with COAP priority, and let scheduler take care of it
void cexample_timer_cb(){
   scheduler_push_task(cexample_task_cb,TASKPRIO_COAP);
}
The timer is actually firing during your microprocessor's interrupt service routine. It would be bad practice to execute your function here. Instead, we push our function into the OpenOS scheduler, and tell it to execute when the OS deems best.
Sampling the ADC once the timer expires
Every micro-controller has a different means by which to sample its ADC. In the rex example, we are using the ADC on an MSP430. The code to take an ADC reading will be different for each micro controller. Please see the rex example in the OpenWSN repository for how to do it on the MSP430, or edit the code below to suit your purposes:
void cexample_task_cb() {
   OpenQueueEntry_t*    pkt;
   owerror_t            outcome;
   uint8_t              i;

   uint16_t             x_int       = 0;
   uint16_t             sum         = 0;
   uint16_t             avg         = 0;

   // don't run if not synch
   if (ieee154e_isSynch() == FALSE) return;

   // don't run on dagroot
   if (idmanager_getIsDAGroot()) {
      opentimers_stop(cexample_vars.timerId);
      return;
   }

   //Take ADC reding here and store it in the avg value
   avg = SampleADC(); //This will be custom for your platform

   // create a CoAP RD packet
   pkt = openqueue_getFreePacketBuffer(COMPONENT_CEXAMPLE);
   if (pkt==NULL) {
      openserial_printError(
         COMPONENT_CEXAMPLE,
         ERR_NO_FREE_PACKET_BUFFER,
         (errorparameter_t)0,
         (errorparameter_t)0
      );
      openqueue_freePacketBuffer(pkt);
      return;
   }
   // take ownership over that packet
   pkt->creator                   = COMPONENT_CEXAMPLE;
   pkt->owner                     = COMPONENT_CEXAMPLE;
   // CoAP payload
   packetfunctions_reserveHeaderSize(pkt,PAYLOADLEN);
   for (i=0;i<PAYLOADLEN;i++) {
      pkt->payload[i]             = i;
   }
   avg = openrandom_get16b();
   pkt->payload[0]                = (avg>>8)&0xff;
   pkt->payload[1]                = (avg>>0)&0xff;
   packetfunctions_reserveHeaderSize(pkt,1);
   pkt->payload[0] = COAP_PAYLOAD_MARKER;

   // content-type option
   packetfunctions_reserveHeaderSize(pkt,2);
   pkt->payload[0]                = (COAP_OPTION_NUM_CONTENTFORMAT - COAP_OPTION_NUM_URIPATH) << 4
                                    | 1;
   pkt->payload[1]                = COAP_MEDTYPE_APPOCTETSTREAM;
   // location-path option
   packetfunctions_reserveHeaderSize(pkt,sizeof(cexample_path0)-1);
   memcpy(&pkt->payload[0],cexample_path0,sizeof(cexample_path0)-1);
   packetfunctions_reserveHeaderSize(pkt,1);
   pkt->payload[0]                = ((COAP_OPTION_NUM_URIPATH) << 4) | (sizeof(cexample_path0)-1);

   // metadata
   pkt->l4_destination_port       = WKP_UDP_COAP;
   pkt->l3_destinationAdd.type    = ADDR_128B;
   memcpy(&pkt->l3_destinationAdd.addr_128b[0],&ipAddr_motesEecs,16);

   // send
   outcome = opencoap_send(
      pkt,
      COAP_TYPE_NON,
      COAP_CODE_REQ_PUT,
      1,
      &cexample_vars.desc
   );

   // avoid overflowing the queue if fails
   if (outcome==E_FAIL) {
      openqueue_freePacketBuffer(pkt);
   }

   return;
}
The above function allocates an OpenWSN packet, sets its ownership properties to the CEXAMPLE app. It also samples the ADC and stores the ADC result in a 16bit variable. This variable is then passed into an OpenWSN packet, along with some CoAP settings. Furthermore, the application selects a destination address
"pkt->l3_destinationORsource.addr_128b0" which denotes the IPv6 address our packet is intended for. In this case the address is "ipAddr_motesEecs," which is the IPv6 address of our server (http://motes.eecs.berkeley.edu).(Note: this server is temporally down) If you are running your own CoAP server, replace this address with the address of your server.
Setting up OpenVisualizer to forward IPv6 CoAP packets
We already have IPv6 for your motes, even if you are running on an IPv4 network. Create a network of at least two motes (one manager, one end node). Start the OpenVisualizer script. Please see other tutorials on these details. Load an LBR file in the visualizer. Select the guest.lbrauth file. OpenVisualizer will take care of the rest. If everything works out, your entire network will now have IPv6 addresses. Every time your application takes an ADC reading, it will also now send it via OpenVisualizer to the remote server.
Retrieving and plotting data in real time
As previously mentioned, you can deploy your own server to handle incoming IPv6 packets. In this example, we will use the http://motes.eecs.berkeley.edu server, which is already running an application that listens on the TCP port for incoming mote packets, parses them, and stores the data in http://motes.eecs.berkeley.edu/data. Once your system is running, you can simply view your data stream there. To find your mote, look at its MAC address and find it in the data folder.
